¶ OneLaser Hydra Gen 2
¶ Introduction
This manual serves as a comprehensive resource for the installation, operation, and maintenance of the ONELASER Hydra Gen 2 laser system. It details all necessary procedures, from initial setup to daily use and maintenance, with a strong emphasis on safety protocols. All users must read and understand this manual in its entirety prior to operating the system.
¶ Why Choose the Hydra Gen 2?
The Hydra Gen 2, the flagship model of the ONELASER Hydra series, is equipped with a dedicated, high-power, new generation CO₂ RF laser source. It is designed for modern precision manufacturing and high-efficiency production, offering a powerful combination of exceptional processing quality, high speed, and versatile material handling.
- Precision Grayscale Control: The wide 0–70W power range allows for master-level grayscale processing. It precisely renders intricate gradients, from subtle surface marks to deep engravings, delivering photo-realistic detail with stunning clarity.
- High-Speed Accuracy: Powered by a new hybrid motion system and an ultra-fast modulation frequency, the Hydra Gen 2 guarantees pinpoint accuracy at speeds up to 2000 mm/s. This ensures sharp, high-resolution (2000 DPI) output on complex graphics and fine text, dramatically increasing productivity.
- Efficient Power Output: The dedicated 70W new generation CO₂ RF laser source delivers more power where it is needed. This significantly increases material removal rates, enabling deeper and faster cutting of thick materials to reduce cycle times and maximize production efficiency.
¶ Important Notice
For safe operation and optimal performance of your Hydra machine, you MUST strictly follow all specifications and ONELASER’s installation requirements.
Failure to do so could result in:
- Reduced performance and poor results
- Shortened machine lifespan
- Higher maintenance costs
- Serious machine damage
- Potential safety hazards
This manual provides the essential installation specifications. We strongly advise that all users read and fully understand every instruction and warning in this guide before installing or operating the machine.
¶ Need Help?
If you encounter any issues during installation, contact our technical support team immediately.
¶ Table of Content
¶ Chapter 1. General
¶ 1.1 Safety Information
Carefully read this entire document before installing and operating the machine.
WARNING:
Failure to read, thoroughly understand, and strictly adhere to the instructions in this operation manual may result in serious personal injury, death, property damage, fire, electric shock, machine malfunction, degraded performance, reduced machine lifespan, or severe damage to the machine!
The following symbols and notes are used to alert users to potential hazards and critical operational information. Pay close attention:

High Voltage:
There is a risk of electric shock. This device can only be maintained by professionals.
Laser Radiation:
This device has laser radiation function. Please pay attention to the danger of laser beam. Please avoid direct exposure of eyes or skin to laser during operation. Be sure to follow the safe operating procedures to prevent personal injury or machine damage.

Fire Hazard:
High potential for fire. NEVER RUN UNATTENDED!
CAUTION:
1.Use Only Approved Parts: When replacing machine components, only use the components or spare parts provided or listed in the associated parts list. The use of third-party components may lead to abnormal machine performance, increased safety risks, and will void the product warranty.
2.Follow Auxiliary machine Instructions: Auxiliary machine supplied with this device is accompanied by its own dedicated instruction manual. Installation or operation of any auxiliary machine must strictly comply with the requirements specified in its respective manual. (Contact us if you require related information).
1.2 Compatible Materials
The Hydra Gen 2 offers exceptional material compatibility and is capable of processing a wide range of substrates:
The laser can process a wide variety of materials such as rubber, acrylic, cork, cardboard, glass, leather, marble, various plastics, and wood. Additionally, it supports engraving directly onto coated, painted, or anodized metal surfaces, significantly expanding its application scope.

Notice:
This device has laser radiation function. Please pay attention to the danger of laser beam. Please avoid direct exposure of eyes or skin to laser during operation. Be sure to follow the safe operating procedures to prevent personal injury or machine damage.
1.3 Disposal Suggestion
Do not dispose the machine with domestic waste!
Electronic devices have to be disposed according to the regional directives on electronic and electric waste disposal. In case of further questions, please ask your supplier. He might take care of proper disposal.
1.4 Specifications
While our 70W CO2 RF laser source is primarily equipped on the Hydra 7 and Hydra 9 models for peak performance, we are happy to offer customized solutions. If you would like to have the 70W laser integrated into another Hydra model, please contact us to discuss your specific needs.
Mechanics
|
|
Hydra 7 |
Hydra 9 |
|
Working Area |
700mm*500mm (27.56'' x 19.69'') |
900mm*600mm (35.43'' x 23.62'') |
|
Table Size |
790*590mm (31.10'' x 23.23'') |
990*690mm (38.98'' x 27.17'') |
|
Z Axis Height |
225mm (8.85'') |
|
|
Max Work Height |
225mm (8.85'') |
|
|
Max. Speed |
2000mm/s, @4G |
|
|
Motor |
Servo motor and step motor |
|
|
Work Piece Table |
Honey comb table |
|
|
Max. Table Load |
20kg |
30kg |
|
Net Weight |
175kg |
311kg |
|
Standard Head |
2.5” |
|
|
Focus Lens |
2.5”@Focal length 20mm@Diameter |
|
|
Mirror Diameter |
25mm |
|
|
Beam Combiner Diameter |
20mm |
25mm |
|
Feed-Through Door Design |
Features a pass-through design allowing material to enter from the front and exit from the back. Provided the material remains balanced and adequately supported during processing, there is theoretically no limit to the material length that can be handled. |
|
Dimensions
|
|
Hydra 7 |
Hydra 9 |
|
W x D x H |
1300*1045*1035mm (51.18”x 41.14”x 40.74”) |
1500*1045*1035mm/1900*1045*1035mm |
Max Part Size (W x L x H)
|
|
Hydra 7 |
Hydra 9 |
|
Pass Through |
700x∞x20mm (27.55''x∞''x0.78'') |
900x∞x20mm (35.43''x∞''x0.78'') |
Features
Standard:
Open flap protection, High temperature alarm protection, Smart air-assist control, “No Water “protection for retrofitting a glass tube CO2 laser.
Red dot pointer, Auto focus, Smart board, Motorized table, Honey comb table, Aluminum blade cutting table, Feed-Through door, 2,5”(50.8mm) Focus lens, Warning light, Emergency stop, Control display, Easily adjustable home position, Maintenance mode, Air pump, Exhaust fan.
Optional:
Rotary attachment, High air compressor set (Includes water filter).
Control System
|
Laser Power |
Adjustable from 1 - 100% (typically 5-100%) |
|
Interface Hardware |
USB: connect to PC Ethernet: connect to PC WI-FI: connect to PC |
|
Interface Software |
MakerBoost, RDWorks, LightBurn |
|
Operating Modes |
Optimized raster, vector, and combined mode |
|
Buffer Memory |
1G standard |
Cooling System
|
Machine Cooling System |
Air-Cooled |
|
Laser Source Cooling System |
Air-Cooled |
Electricity
|
|
38 WATT |
70 WATT |
|
Electricity Requirement |
110 Volt AC, 50 or 60Hz, Single phase Machine requires either 110V voltage(customized from factory); Support both 50Hz and 60Hz, single phase |
|
Ambient Conditions
|
Ambient Temperature |
+15°C to +35°C / 59°F to 95°F |
|
Humidity |
40% to max. 70%, not condensing |
Laser Safety
|
Laser Class |
Laser Class II |
1.5 RF Laser Source
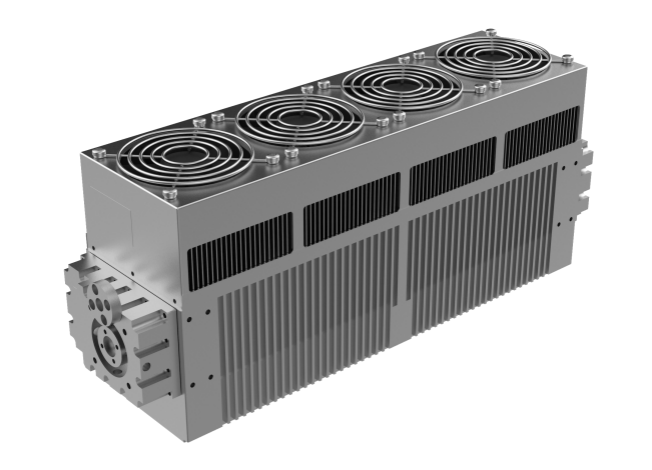
¶ 1.5.1 70W Air-Cooled RF Metal Laser Tube
- Integrated Industrial Design: The OLRF-70 features a sealed, integrated industrial module design that incorporates a highly stable CO2 laser tube, an RF power supply system, and an actively cooled fan.
- Wide Power Range: Offers a broad laser output power range, continuously adjustable from 1W to 70W.
- Superior Beam Quality: Exceptional beam quality (M² < 1.2) ensures laser energy can be focused to an extremely fine spot (spot size down to 0.07mm), delivering significantly higher processing precision and a longer operational lifespan compared to traditional glass laser tubes.
- Robust & Reliable: Engineered for outstanding durability, the Hydra Gen 2 reliably performs in demanding industrial environments, including those with dust and temperature/humidity fluctuations, establishing it as the industrial benchmark in its class.
¶ 1.5.2 Detailed Parameter Comparison: 38W vs. 70W CO2 RF Lasers
Performance Parameters
|
|
38W CO2 |
70W CO2 |
Advantages |
|
Average Power |
>30W |
>60W |
The 70W laser has more than double the power of the 38W laser. This means the 70W laser can achieve faster processing speeds, deeper cutting depths, or more pronounced marking effects on the same material. |
|
Output Power Range |
0-38W |
1-70W |
The 70W laser has a wider power adjustment range, enabling it to handle a broader spectrum of materials and applications, from fine marking to medium-power cutting. |
|
Wavelength |
10.6μm (Wavelength Range: 10.55-10.63μm) | 10.6μm (Wavelength Range: 10.3-10.8μm) | Nearly identical |
|
Excitation Mode |
RF |
RF |
Identical |
|
RF Frequency |
100MHz |
81.36MHz |
Typically related to the laser cavity design and operating characteristics; impact on processing performance is not significant. (Note: This implies differences exist but are minor). |
|
Beam Quality |
<1.2 |
<1.2 |
Identical and Excellent |
|
Modulation Frequency |
0-25kHz |
0-50kHz |
May perform better in applications requiring rapid laser switching or high-speed marking, especially in pulsed mode. Higher modulation frequency allows finer grayscale control and smoother scanning effects. (Note: This suggests the 70W likely has a higher frequency). |
|
Power Stability |
≤±5% |
≤±7% |
38W laser has the advantage, exhibiting smaller output power fluctuations. |
|
Beam Diameter |
1.8±0.2mm |
2.1±0.3mm |
Minimum Focused Spot Size: Difference is minor/negligible |
|
Beam Divergence |
7.5±0.5mrad |
≤7.5mrad |
Nearly identical |
|
Polarization |
Perpendicular to base, >100:1 min | Linear, Parallel to the base | Both are linearly polarized, which is beneficial for certain polarization-sensitive applications. |
Size Parameters
|
|
38W CO2 |
70W CO2 |
Influence |
|
Dimensions |
360*90*143mm |
402.5*100*160mm |
Generally, higher-power lasers require larger size and weight to accommodate greater thermal management needs. |
|
Weight |
6.1kg |
7.5kg |
Similar to size, higher power usually accompanies higher weight. |
|
Input |
48VDC±2VDC/12.5A(Max.) |
48VDC±0.5VDC/18A (Max.) |
The 70W laser has higher demands on power supply quality and stability. |
|
Cooling |
Air-cooled |
Air-cooled |
CO2 |
|
Rise and Fall time |
<100us |
<100us | Its fast response time is a significant advantage for applications that demand high-speed switching and precise control. |
The test data indicates that the main advantages of the 70W CO2 RF laser compared to the 38W CO2 RF laser are:
- Higher Power: Capable of processing thicker, harder materials, or achieving faster processing speeds on the same material.
- Wider Power Adjustment Range: Greater adaptability, suitable for various applications ranging from fine marking to medium-power cutting.
- Higher Modulation Frequency: Potentially better performance in high-speed scanning and fine control applications.
¶ 1.5.3 Test Data for 70W CO2 RF Laser
Spot size obtained with different focal length lenses
|
Lens Focal Length |
Spot Size |
|
2.5 inch |
119.173 um |
|
3.0 inch |
153.028 um |
|
4.0 inch |
165.990 um |
¶ 1.5.4 Dual Laser Source Upgrade
The Hydra Gen 2 inherits the Hydra series' modular design, facilitating easy disassembly. The factory has reserved an upgrade slot for the laser source, providing users with the possibility for post-purchase upgrades to higher-power glass tubes (up to 150W) or even fiber lasers, meeting evolving processing demands.
Processing Characteristics of the 150W Glass Tube:
1.Moderate Power, Wide Applicability: Suitable for cutting and engraving various materials. Its power level avoids excessive energy consumption or operational complexity associated with significantly higher-power lasers.
2.Beam Properties Suited for Non-Metal Fine Processing: The beam characteristics of glass tube output ensure good smoothness on non-metal cutting edges and engraving precision, meeting the accuracy requirements for most non-metal processing tasks.
Processing Characteristics of Fiber Lasers with Q-Switching (Fiber QS):
Utilizing an Acousto-Optic (AO) Q-switch, the output continuous laser energy is compressed into pulses with an ultra-narrow, fixed pulse width for emission.
Processing Characteristics of Fiber MOPA Lasers:
This technology couples a high-beam-quality seed signal light and pump light into a double-clad fiber in a specific manner for amplification. It achieves high-power amplification of the seed source while offering adjustable pulse width.
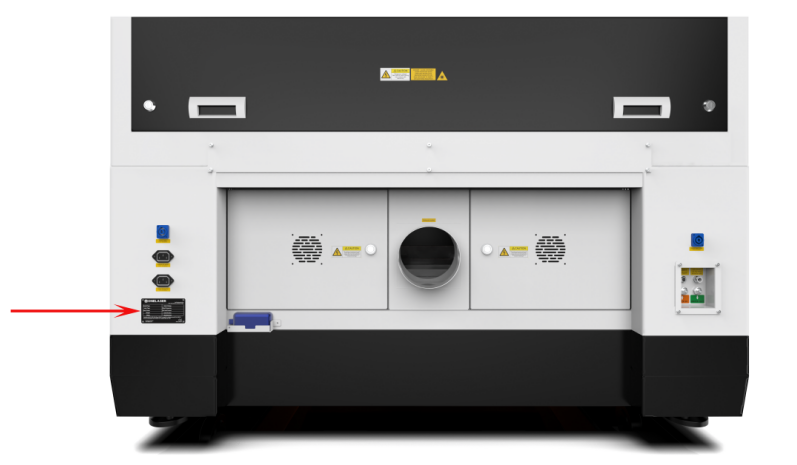
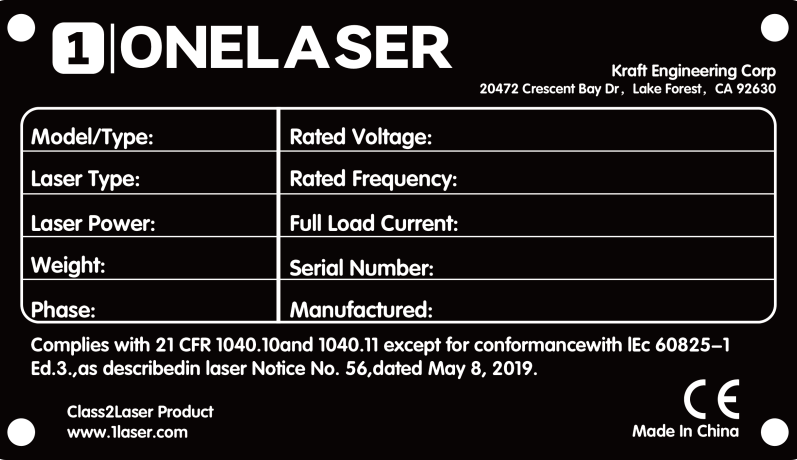
1.6 Machine Nameplate
The manufacturer's information is located on the rear of the unit (see diagram below). Retain all rating plate data for future reference. You may be required to provide the serial number when contacting our support team.
¶ Chapter 2. Safety
¶ 2.1 General Safety Regulations
All personnel involved in machine installation, commissioning, operation, maintenance, or repair must thoroughly read and understand the operation manual (with emphasis on the "Safety Regulations" section). Enterprise users are reminded that internal safety procedures must be established based on personnel qualifications, and written confirmation must be obtained verifying that relevant personnel have completed manual training certification.
Safety Operation Responsibilities
Only trained personnel are permitted to operate the machine. During installation, commissioning, startup/shutdown, operation, parameter modification, maintenance, or inspection, safety shutdown procedures specified in the operation manual must be strictly followed.
User/Operator Safety Rules:
1.Any operation endangering machine safety is strictly prohibited.
2.Operators must ensure the machine is not operated by unauthorized personnel.
3.Operators bear responsibility for pre-operation checks: Confirm no visible damage or defects; immediately report any safety hazards (including operational abnormalities).
4.Users must ensure the machine continuously operates in a safe state.
5.Users must maintain cleanliness (internal/external) and clear operational pathways through standardized procedures.
6.Safety devices must never be removed or disabled (risk of irreversible injury: severe burns, blindness, etc.). If disassembly is necessary for maintenance, immediate restoration post-work is mandatory.
7.Activities like commissioning, modification, reconfiguration, or maintenance must be performed by certified personnel with power disconnected.
8.Any unauthorized modification voids the warranty (excludes preventive maintenance, calibration, and adjustments performed per ONELASER specifications).
2.2 Laser Safety Information
1.The Hydra Gen 2 is classified as a Class II laser product according to international safety standards. This classification indicates the laser system is safe during normal operation due to its protective housing and integrated safety features.
Critical Warning:
Tampering with safety features, performing unauthorized modifications, or operating the device improperly can override the Class II safety design. This may result in the emission of harmful, hazardous laser radiation, posing a serious risk of eye and skin injury.
2.This laser engraving system contains a carbon dioxide (CO2) laser of Class IV that emits intensive and invisible laser radiation. Without safety precautions the direct radiation or even diffuse reflected radiation is dangerous!
3.Without safety precautions, the following risks exist with exposure to laser radiation:
Eyes: Burns to the cornea / Skin: Burns / Clothing: Danger of fire
4.Never try to modify or disassemble the laser and do not try to start up a system that had been modified or disassembled!
5.Dangerous radiation exposure can result from the use of operation or adjustment machine other than that described here, and if different operational methods are performed.
2.3 Safety Precautions when Operating the Device
Hydra Gen 2 has an integrated safety system which immediately stops the job when the protection cover (Lid) is opened. An incomplete job will occur if the cover is opened during operation. Press the "PAUSE" button first if you want to interrupt an engraving process.
Please remember the following safety precautions when working with this device:
1.CO2 Fire extinguishers should be placed near laser. Always keep a properly maintained and inspected fire extinguisher on hand.
2.Do not store any flammable materials in the inside of the device. Particularly leftovers of produced materials have to be removed to prevent fire hazard.
3.Please maintain free airflow around this system at all times. Do not cover the machine while in operation.
4.Stay with the laser. Do not leave the laser unattended when it is working, small scraps can ignite and without supervision can destroy the machine if not checked.
5.Use Air Assist. Always use the system’ s Air Assist feature when vector cutting.
1.These lasers emit invisible radiation; safety glasses should be worn when maintaining these machines for your protection.
2.Adjustment of the beam path must be performed only by specially trained personnel. An improper setting can lead to uncontrolled emission of the laser radiation.
1.Do not disable limit switches or safety features as this can invalidate warranties and cause damage to you and the machine.
2.Before processing materials, the user must: Verify if harmful materials will be generated and if the exhaust system's filters are suitable for them. Select filters and the exhaust system based on national/regional threshold limits for dust, mist, and gases (ensuring maximum workplace concentration values are not exceeded).
3.PVC (polyvinyl chloride) must under no circumstances be processed with the laser.
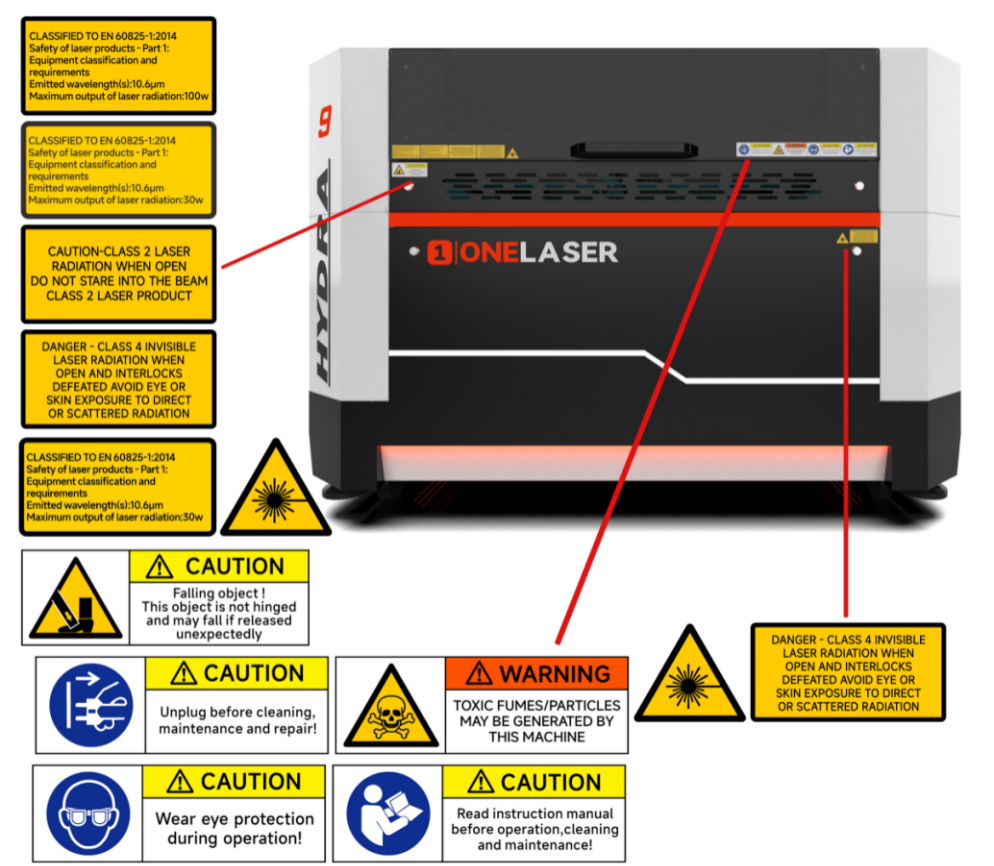
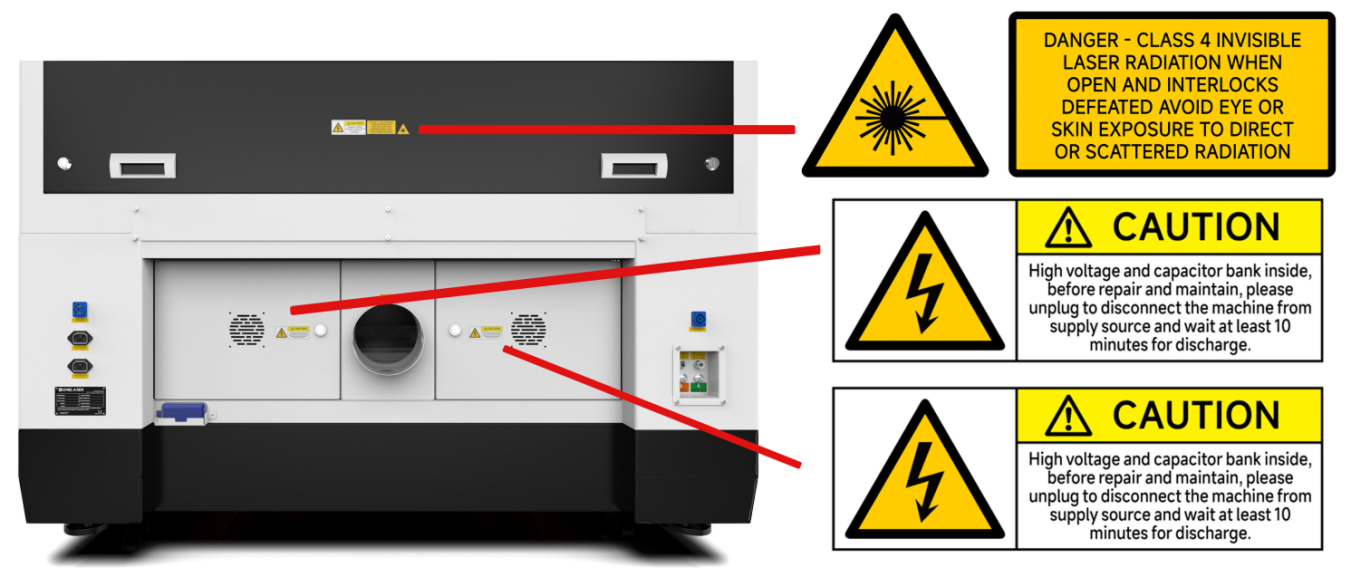
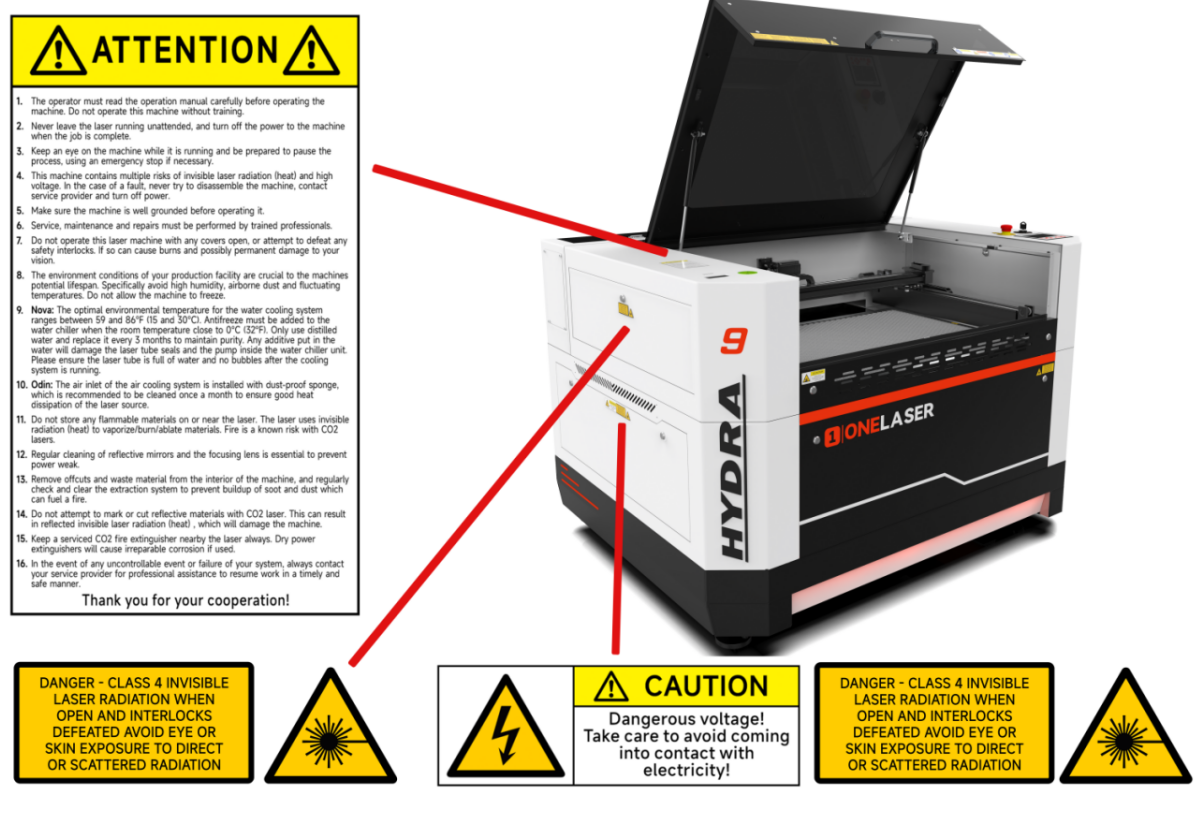
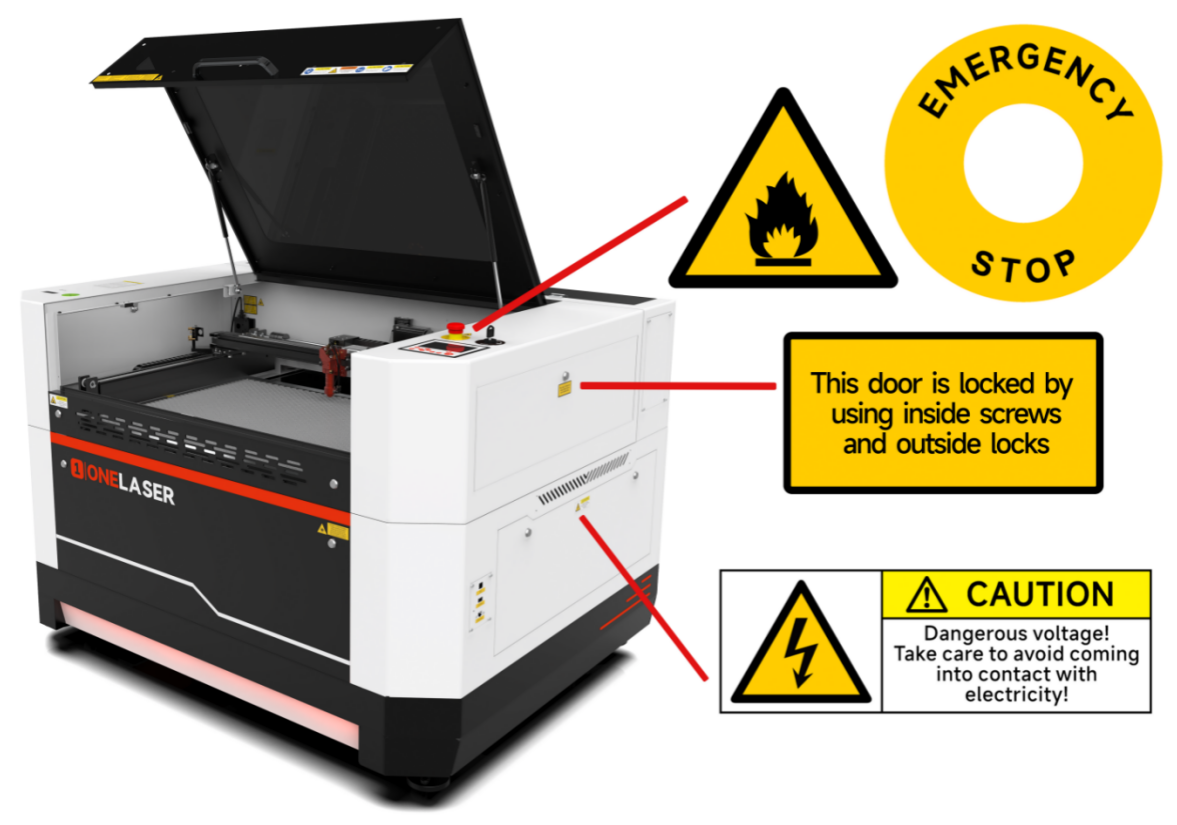
2.4 Warning and Information Labels
The warning and information labels in various locations if the machine should always be read carefully and understood. If labels are lost or damaged, they must be replaced immediately.
¶ Chapter 3. Install Machine Accessories
¶ 3.1 Exhaust System Requirements
Effective smoke extraction is essential for removing hazardous combustible fumes generated during laser processing. This machine must be equipped with a safety-compliant exhaust system including:
- A blower meeting rated flow capacity, duty cycle, and airflow requirements
- Correctly installed ducting and accessories
- (Recommended) An inline filtration system for efficient removal of fine particulates and odors.
Do not start the machine without an adequate exhaust system.
3.2 Air System Requirements
The air system helps:
- Lens cleanliness and cooling during engraving
- Reduced combustion and debris clearance during cutting
For enhanced performance, external air compressors may be connected to increase output pressure.
Always use the system’ s air assist feature when cutting or engraving.
3.3 Air Cooling System Requirements
The Hydra Gen 2 features innovative air-cooling technology, eliminating the complexity of water-cooled systems. Benefits include:
- No preheating required - Instant start-up for engraving
- Quieter operation (4 high-performance fans, 90.4 CFM max each)
- Simplified maintenance
- 20-second RF tube pre-ionization after initialization
- High thermal tolerance (up to 80°C)

3.4 Water Cooling System Requirements
The Hydra Gen 2’ s design includes provisions for retrofitting a glass tube CO2 laser.:
- Optional high-power glass tube installation (up to 150W)
- Water-cooling system required post-upgrade for thermal management
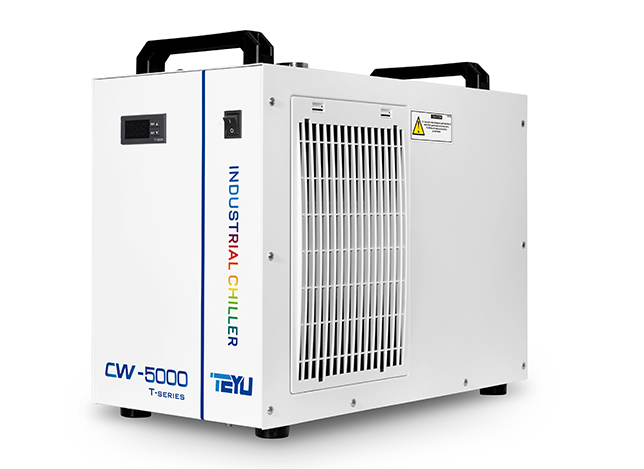
The genuine S&A CW-5000 series active water chillers can keep the laser tube cool. Overheating severely shortens tube life and causes irreparable damage to the tube. The supplied chiller only cools so it is of utmost importance to keep your laser from freezing!
Operation is strictly prohibited without a fully functional water-cooling system after installing glass tubes.
3.5 Computer Requirements
The following recommendation represents the minimum requirements. When using a more powerful computer the graphics are generated and displayed faster and the computing times and the data transfer to the laser are reduced. To use the newest software version, you might have to abide other requirements.
Minimum system requirements (based on Qt 6.8.3 program):
|
|
MacOS |
Windows |
|
Operating System |
macOS 12 or later |
Windows 10 ( 64 bit ) or later
|
|
RAM |
4GB or higher |
4GB or higher |
|
Processor |
Apple M series |
x86 64 architecture,Intel Core 2 Duo / AMD 64-bit processor or higher |
|
Display |
1400 x 1050 or higher monitor resolution |
1400 x 1050 or higher monitor resolution |
|
Storage |
At least 1 GB of available space |
At least 1 GB of available space |
|
Connectivity Interfaces |
1 free USB interface (for supporting external devices) |
1 free USB interface (for supporting external devices) |
Recommended configuration (for a smoother experience):
|
|
MacOS |
Windows |
|
Operating System |
macOS 13 or later |
Windows 11 ( 64 bit )
|
|
RAM |
8GB or higher |
8GB or higher |
|
Processor |
Apple Ml / M2 series or higher |
Intel i5 8th Generation / AMD Ryzen 5 or higher |
|
Display |
1920 x 1080 or higher monitor resolution |
1920 x 1080 or higher monitor resolution |
|
Storage |
SSD, with at least 2GB of available space |
SSD, with at least 2GB of available space |
|
Connectivity Interfaces |
1 free USB interface (for supporting external devices) |
1 free USB interface (for supporting external devices) |
3.6 Connections
Perform the connections exactly in the order described; otherwise electrostatic charging can damage your computer and/or the electronics of the laser system.
¶ 3.6.1 Connecting the Mains
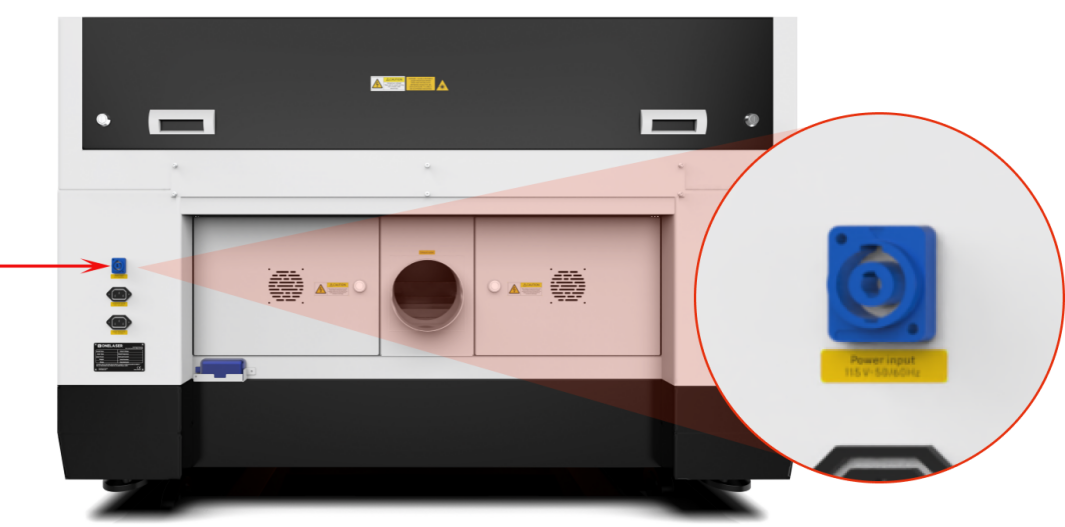
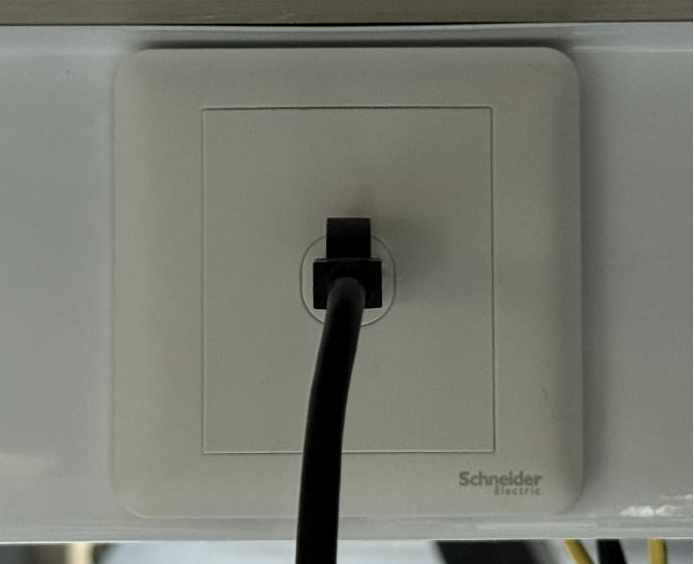
Connect one end of the mains cable with the connection socket named “Power Input” at the rear side of the laser device (see Figure below) and the other end with a protected power outlet.
Mains voltage and operating voltage must correspond (AC 230V 50/60 Hz or AC 115V 50/60 Hz).
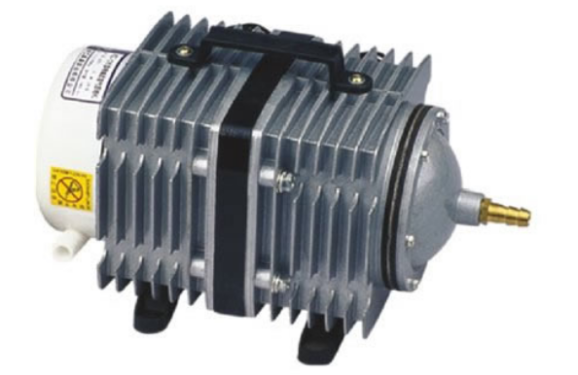
¶ 3.6.2 Connecting the Air System
First of all, install connect the hoses (white side) to the mouth, the other side to the machine. After that, please connect the power cable (of the air system) to the machine. Like below:

The official Air Assist Control unit—when connected to your Hydra Gen 2 system—delivers real-time digital pressure monitoring and activates an auto-stop safety function during pressure anomalies, ensuring reliable, damage-free processing operations. For installation procedures, consult the 4.6 How to Use Air-assist Control.
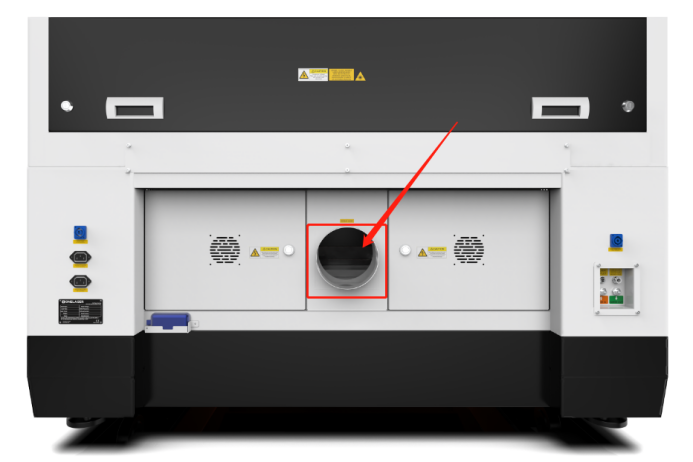
¶ 3.6.3 Connecting the Exhaust System
Insert one side of the gray exhaust pipe into the fan inlet and the other side into the fuselage behind the exhaust tank. Insert one side of the gray exhaust pipe into the fan outlet and put the other side of the pipe outside where you work (If the machine is far from the outside of the room that the gas manufactured by the machine cannot be discharged; then you might need and dust/fume filter, it can keep the air quality of your working environment well).
Please refer to the following pictures about how to install the exhaust pipe:
¶ 3.6.4 Connecting the Cooling System (After Glass Tube Upgrade)
1.Open the Toolbox, and then take out the water pipes, water-error signal cable and chiller power cable.
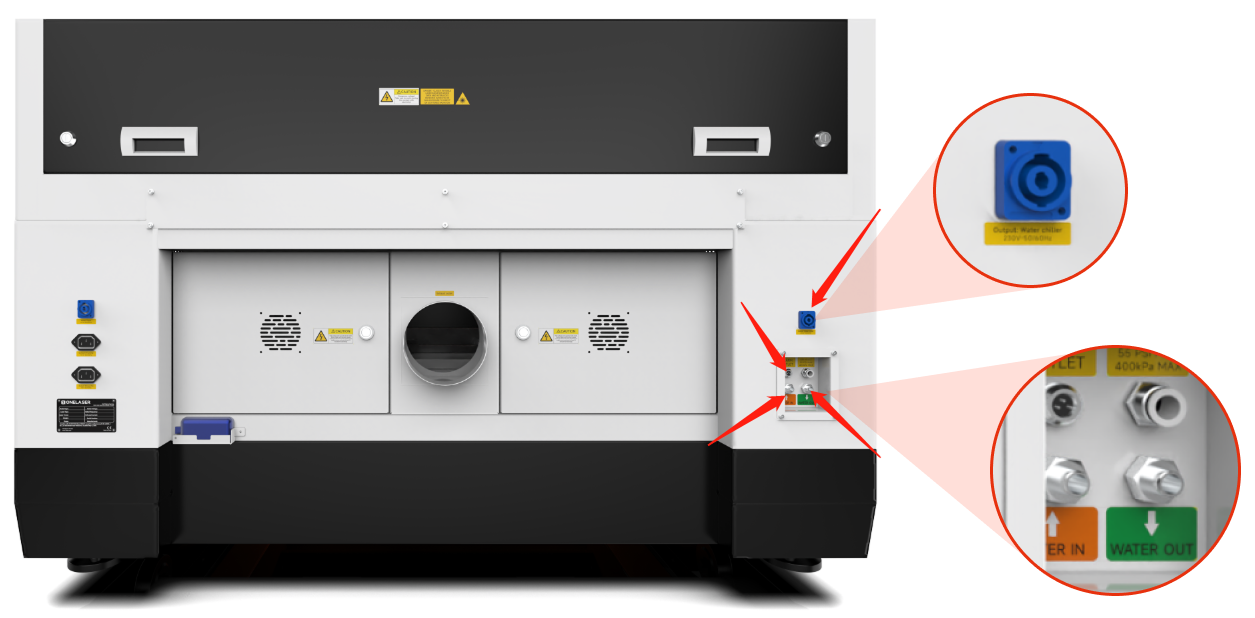
2.One of the water pipes, please connect to the water chiller where marked as “OUTLET”, the other side of the pipe connect to the machine where marked as “Water IN”.
3.The other pipe, please connect to “INLET” of water chiller and “Water OUT” of machine.
4.The Water-error signal cable, please connect to “ALARM OUTLET” of water chiller and machine.
5.The chiller power cable, please connect it from the laser machine to the chiller.
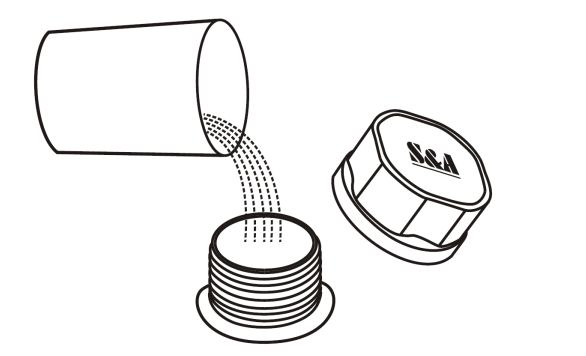
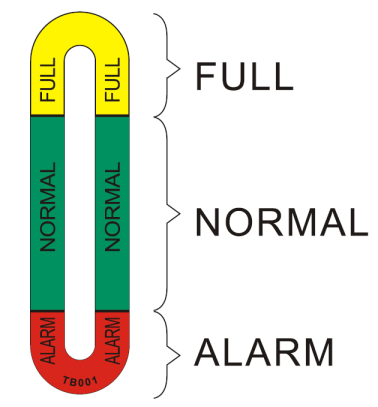
6.Add pure (distilled) water into the chiller until the water level in the green area showing on the gauge. Run chiller for a period of time, the water will fill into the laser tube on the machine, please re-add water to keep the water level in the green area.
Please check again to make sure that the water inlet and outlet of the water pipe between the machine and the chiller are properly connected before starting to run the machine. If the laser tube is filled with water and there are still some bubbles in the laser tube, please press the water inlet tube at the end of the laser tube to squeeze out the bubbles.
¶ Chapter 4. Operation
¶ 4.1 Machine View
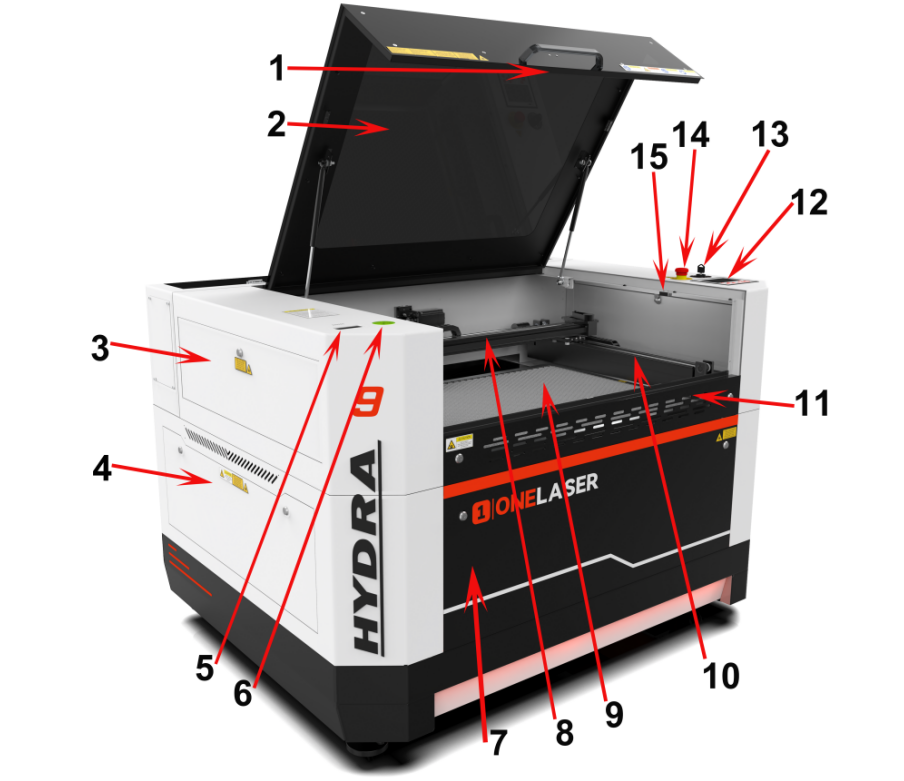
1.Camera
Camera function.
2.Top Flap
If the Top flap is opened, no data is processed. When the protection cover is opened during working, the motion system is stopped and the laser source is turned off. During processing of commands the protection cover must only be opened after pressing the “Pause “button.
3.Left-up Side Door
Many parts inside it, such as Y axis rail.
4.Left Side Door
Many parts inside it, such as RF tube.
5.Air Quality Detector
Detects air temperature and humidity as well as PM2.5.
6.Green Universal Spirit Level
Detect and adjust the horizontal or vertical position to ensure the machine is accurately leveled.
7.Front Door
To clean the waste after working or remove the honey comb table.
8.X Axis (left and right movement)
The motion system is that performs the mechanical movements in X direction.
9.Honey Comb Table
The honey comb plate sits on top of the blade bed and has indexing pins for alignment.
10.Y Axis (forward and backward movement)
The motion system is that performs the mechanical movements in Y direction.
11.Front Up Door
Open this door to use pass-through door.
12.Control Panel
You can control the X-axis, Y-axis and Z-axis manually by the display panel, it also shows the working time, power, speed and the whole working time and affords many function options.
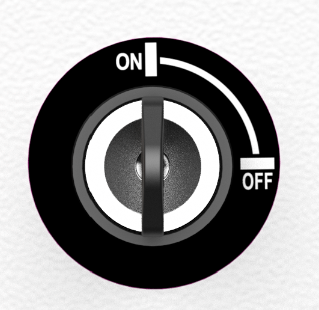
13.Key Switch
To turn on the machine.
14.Emergency Stop Switch
Once there’s an accident happen (laser catch fire, laser out leakage) during working, please turn off this switch immediately. It will be cut off the laser power and motion power immediately.
15.Door Protection Sensor
Laser will stop working once the cover is opened during working.
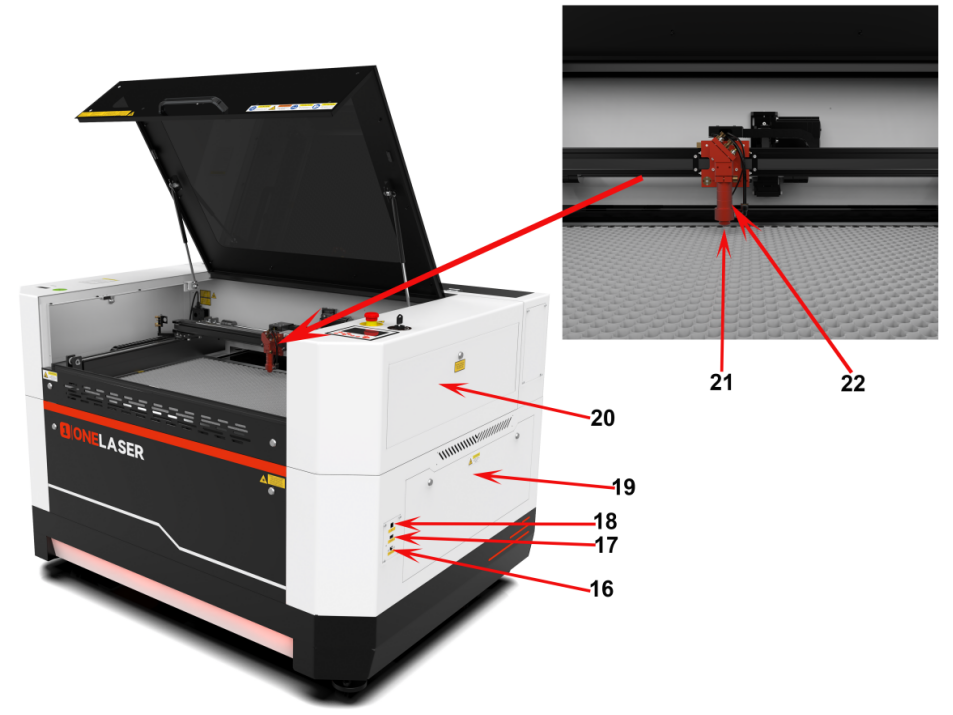
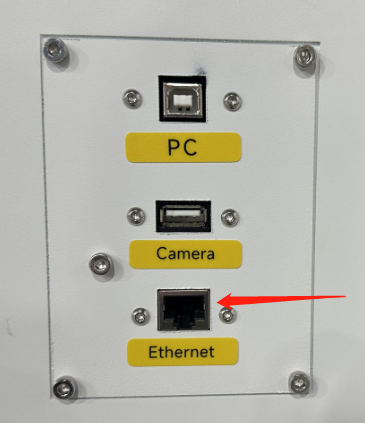
16.Ethernet Connector
Connect machine with Ethernet cable.
17.Camera Connector
Connect the camera.
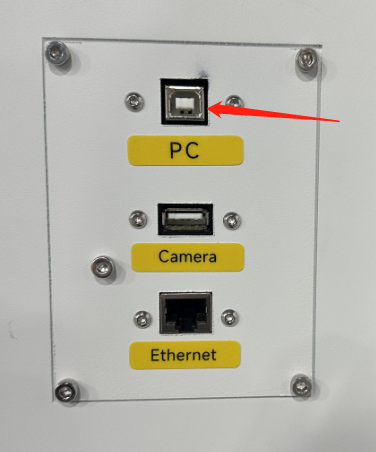
18.PC Connection Port
Connect machine with PC cable.
19.Right Side Door
Many parts inside it, such as Relay,AC contactor.
20.Right-up Side Door
Many parts inside it, such as Y axis rail.
21.Auto-focus Sensor
Used for the automatic focusing of the table.
22.Laser Head
Laser beam and red dot pointer are all come out from the laser head.
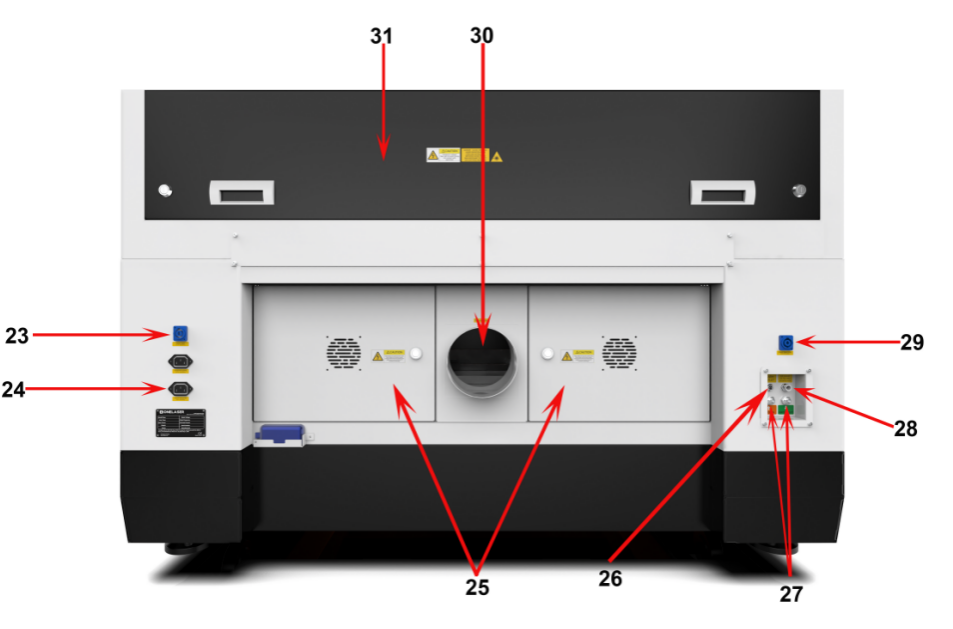
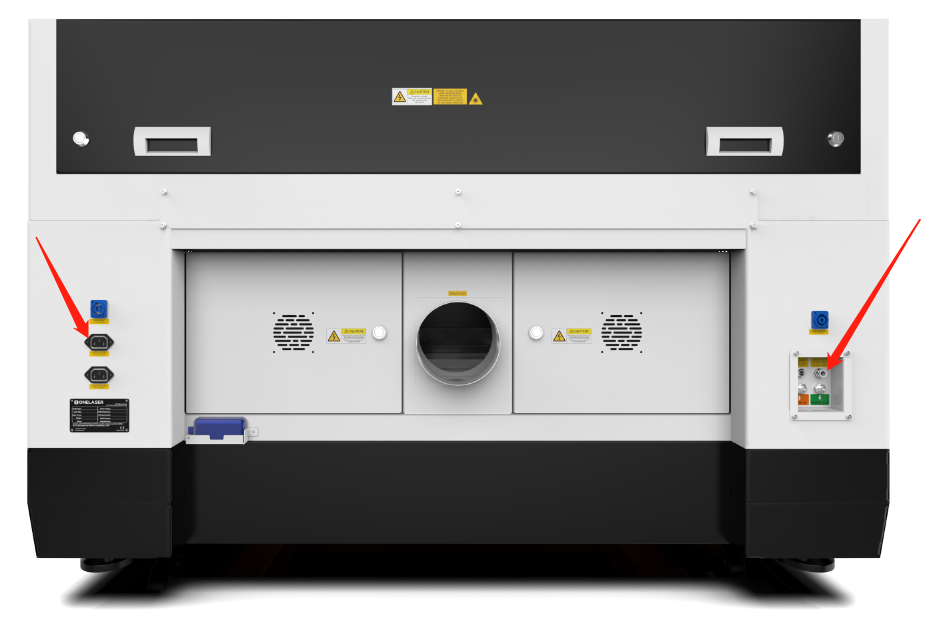
23.Power Socket
Connect the power cable.
24.Serial Plate
Check the serial info.
25.Rear Cover
Many parts inside it, such as 48V power supply.
26.“No-Water protection” Signal Port
This port is connecting the chiller with the signal cable.
27.Water In and Water Out
Connect to the water pipes.
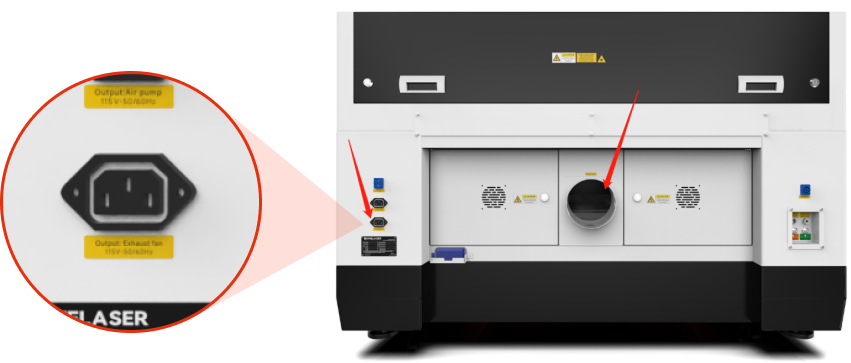
28.Air Intake
Connect the air pipe.
29.Chiller Power Socket
To connect the chiller power.
30.Exhaust Hose
Connect the exhaust hose.
31.Laser Tube Cover
Many parts inside it, such as laser tube.
4.2 ON/OFF Switch
Safety Conditions MUST Be Confirmed Before Startup:
1.Clear all materials and foreign objects from the worktable to prevent collision damage during laser head homing.
2.Ensure the top access door is securely closed.
3.Verify normal operation indicators for auxiliary systems (exhaust/cooling).
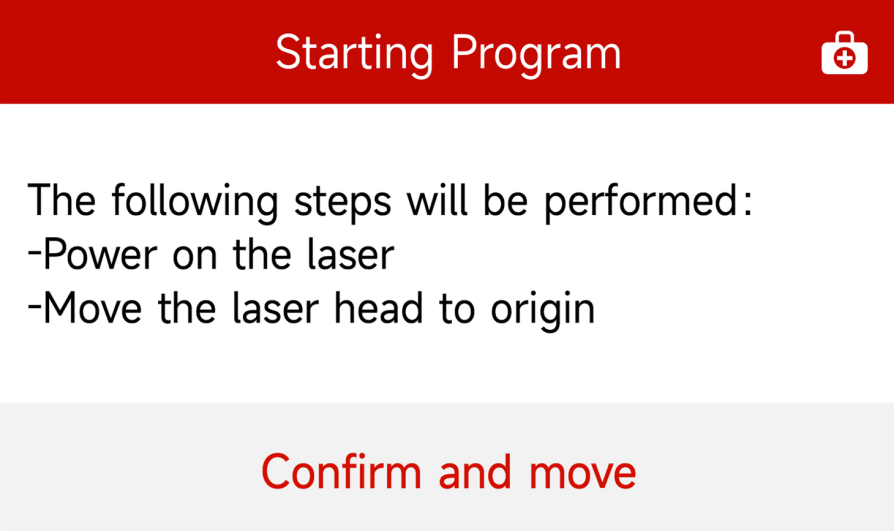
Rotate the safety key switch to the ON position. Then press "Confirm and Move" on the touchscreen control panel. The system will initiate the homing procedure. Upon completion, the home screen will display indicating the system is ready for operation.
4.3 Make Connection between PC and Machine
¶ 4.3.1 Software Installation
MakerBoost
During installation, check the box for "Install device USB driver". Wait for the driver to download automatically. Finally, click "Finish" to complete the installation.
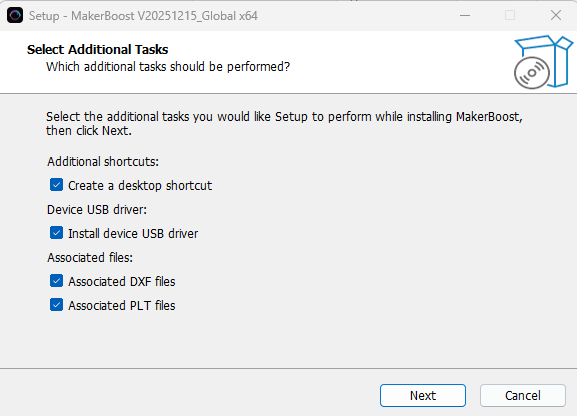
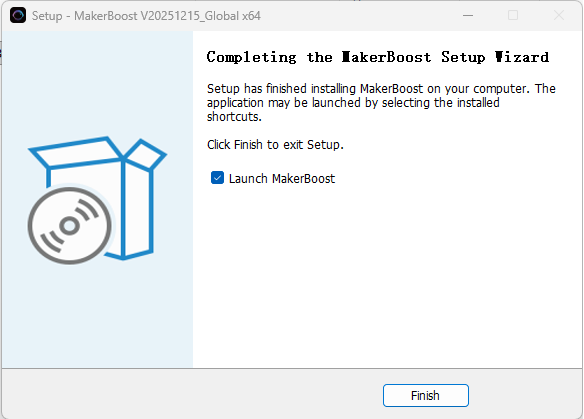
The "MakerBoost" desktop icon will be created automatically. The software is now ready for use.
Lightburn
Please download the corresponding Lightburn at the link below:
https://lightburnsoftware.com/pages/download-trial
If you use USB cable connection, please install the USB driver.

After selecting your options, click "Finish" and then wait for the driver download to complete. You can confirm this and then end the installation process.
A "Lightburn" icon will be automatically added to your Desktop, you are now ready to use the Lightburn.
¶ 4.3.2 Wired Connection
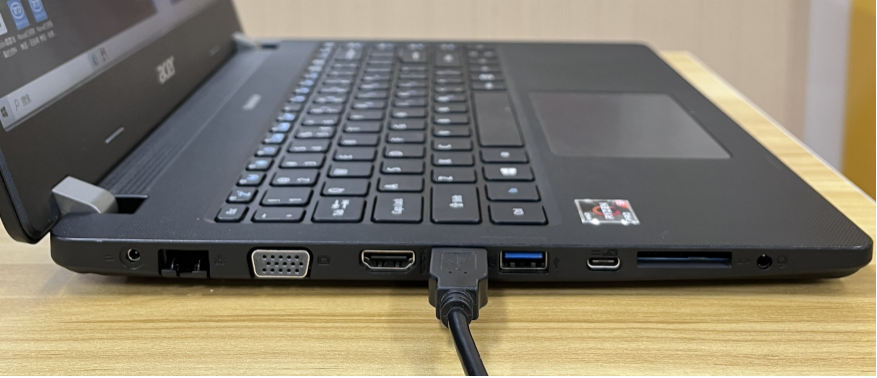
USB Cable Connection
Connecting the Computer and the machine by using the USB cable (Please use a docking station or adapter to connect for MacOS). Like below:
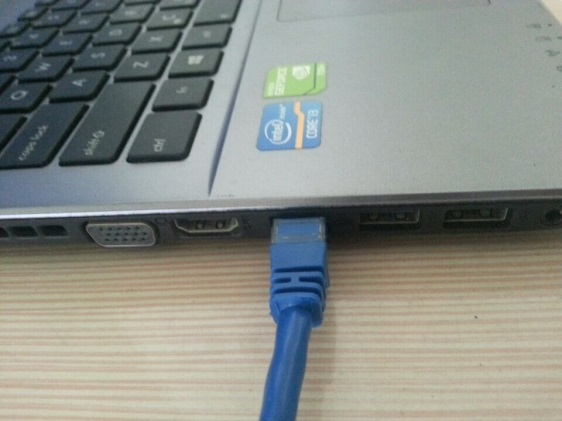
Ethernet Cable Connection
Connecting the Computer and the machine by using the Ethernet cable (Please use a docking station or adapter to connect for MacOS). Like below:
To establish communication between the PC and machine via the above methods, follow these steps:
MakerBoost
Make sure that you have your PC connected to the machine via USB cable or Ethernet cable.
Click "Switch" from right bottom corner of the software, then click "Find" to set up by the Devices setting.

Then follow instructions to complete the connection steps step by step. Select the connection you just created and the display shows "Communication Succeeded" to indicate a successful connection. Now MakerBoost communicates with your laser machine via USB cable or Ethernet cable.

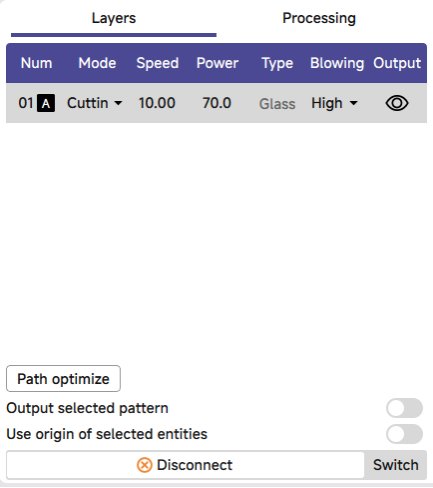
Lightburn
Make sure that you have your PC connected to the machine via USB cable or Ethernet cable.
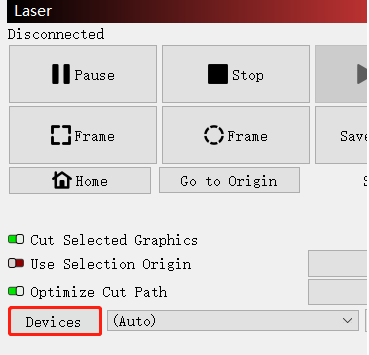
Click "Devices" from right bottom corner of the software. Click "Find My Laser" to set up by the Devices setting.

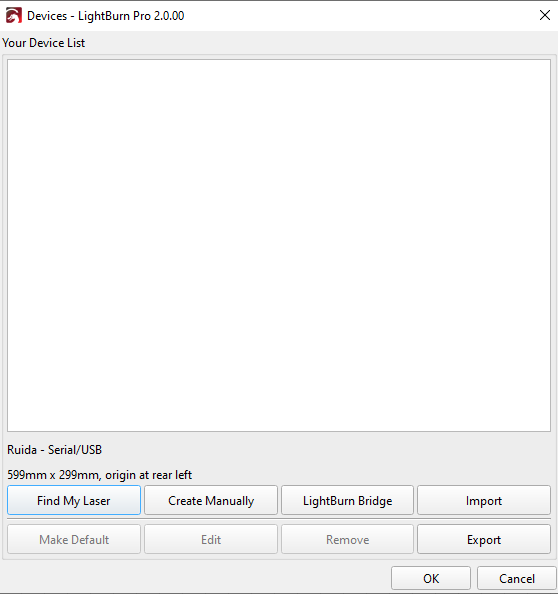
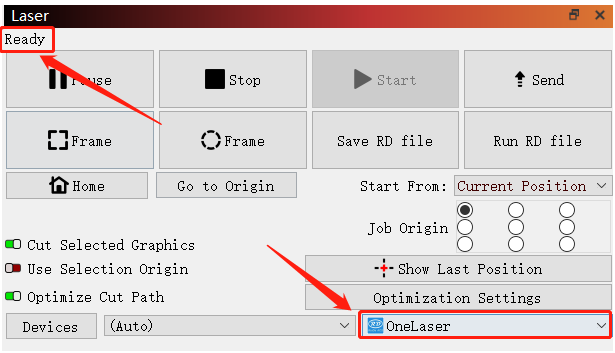
Then follow instructions to complete the connection steps step by step. Select the connection you just created and the display shows "Ready" to indicate a successful connection. Now Lightburn communicates with your laser machine via USB cable or Ethernet cable.
When connecting the machine and the PC for the first time, it may take a few minutes for the operating system to recognize the machine and install the driver.
¶ 4.3.3 Remote Connection
Network Cable Connection
Connect both the Hydra Gen 2 and computer to the network using Ethernet cables.
Critical: Ensure they reside on the same subnet (e.g., 192.168.1. XXX).
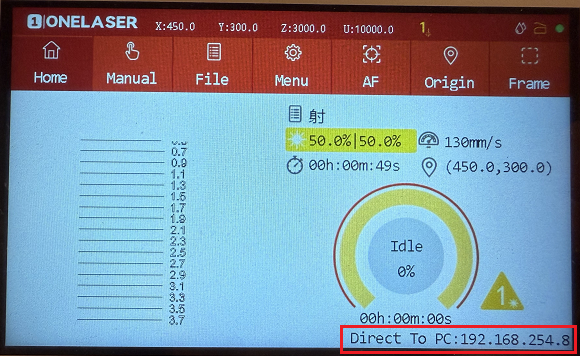
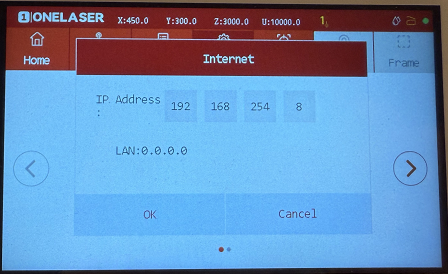
How to Viewing/Modifying Hydra Gen 2 IP Address?

To establish communication between the PC and machine via the above methods, follow these steps:
MakerBoost
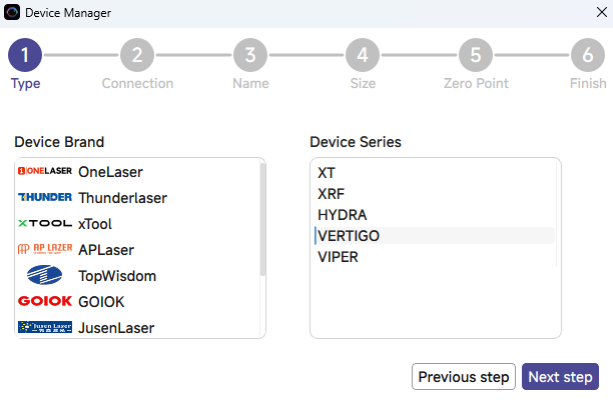
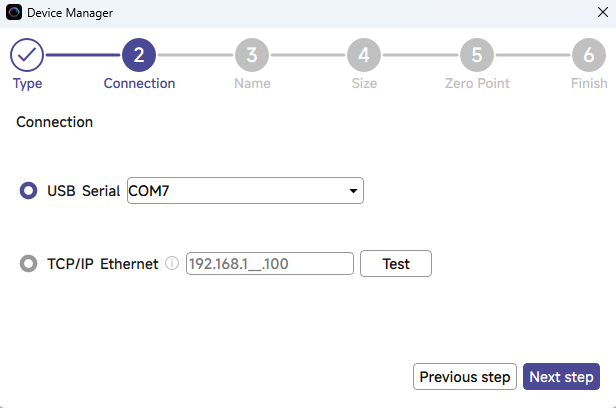
Click "Switch" from right bottom corner of the software, then click "Create" to set up by the Devices setting.

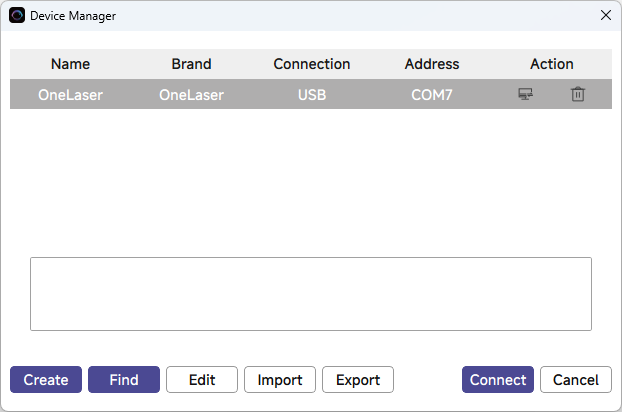
Then follow instructions to complete the connection steps step by step. Critical: The entered IP MUST exactly match the Hydra Gen 2's configured address.
After successful device creation, select the newly created "Hydra Gen 2" entry in the machine list. Then click the "Connect" button. The software will instantly activate the connection.
Lightburn
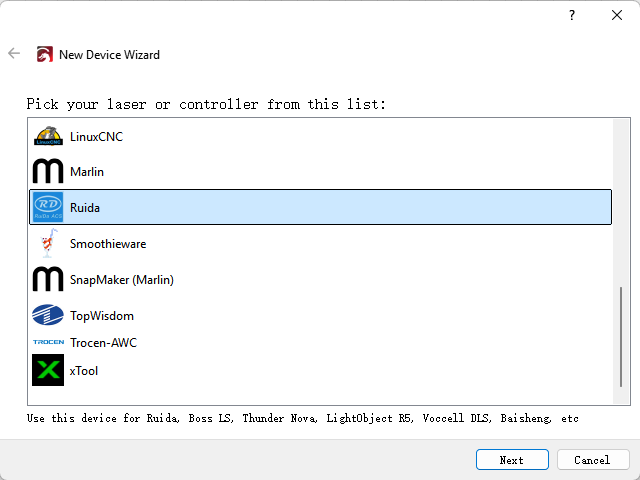
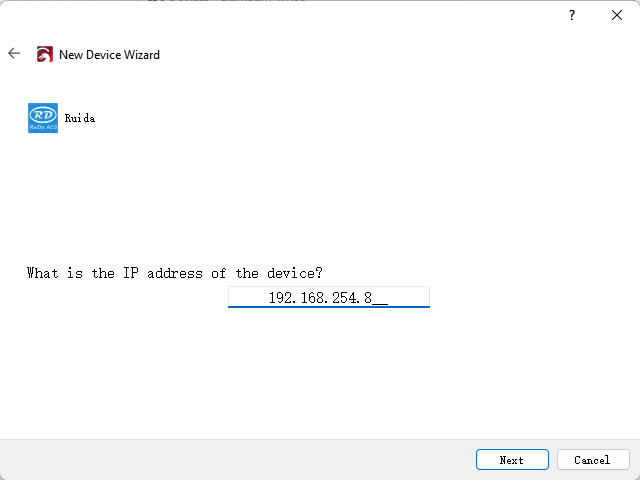
Click "Devices" from right bottom corner of the software. Click "Create Manually" to set up by the Devices setting.
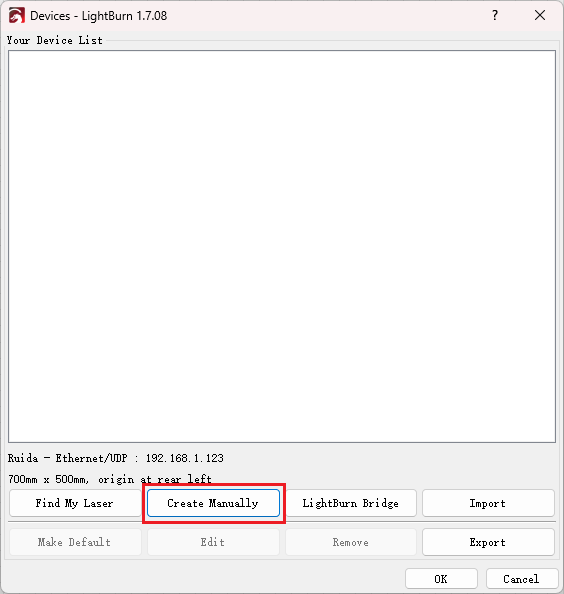
Then follow instructions to complete the connection steps step by step. Critical: Under Controller Type dropdown, MUST select "Ruida". The entered IP MUST exactly match the Hydra Gen 2's configured address.
After successful device creation, locate and select the newly created "Hydra Gen 2" entry in the bottom-right panel (Device List section).

¶ WIFI Connection
The system supports two WiFi modes: Hotspot Mode and Repeater Mode.
1.Hotspot Mode
Connect your computer directly to the Hydra Gen 2's built-in router:
- SSID Format: [Machine Model]_Hotspot_[Last 5 digits of S/N]
(Example: HYDRA70_Hotspot_8A2B4)
- Default Password: 12345678
The hotspot's default IP subnet is 192.168.254.xxx. Set Hydra Gen 2's IP address within 192.168.254.xxx. Important: The last octet of the hotspot's IP must differ from Hydra Gen 2's IP address.
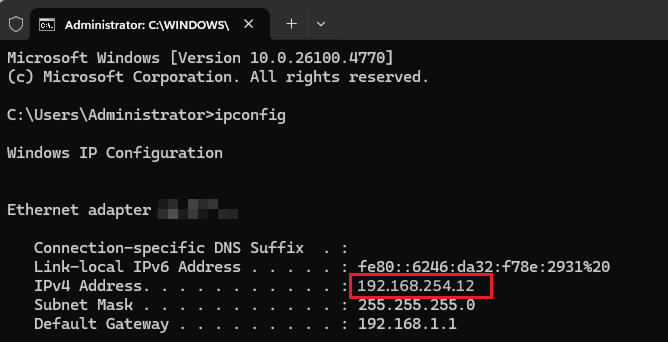
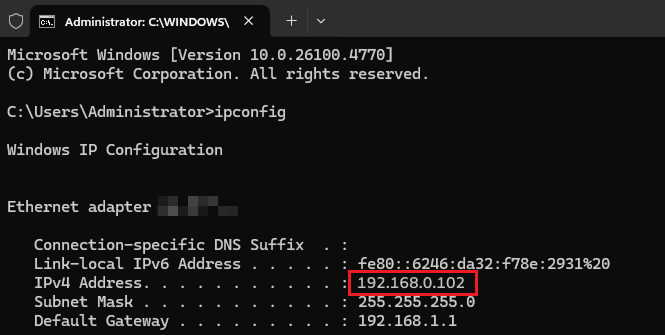
To verify the hotspot subnet on your computer:
①Windows: Open Command Prompt, type "ipconfig", and check the IPv4 address.
②Open WiFi settings, view network details, and locate "IP address".

How to Modifying Hydra Gen 2 IP Address?

2.WI-FI Connection
Users can bridge the Hydra Gen 2's WiFi module to their primary router network. This allows both the Hydra Gen 2 and computer to connect remotely via the user's regular WiFi.
Setup Procedure:
1.Connect your computer to the Hydra Gen 2's hotspot:
- SSID: [Machine Model]_Hotspot_[Last 5 S/N digits]
- Password: 12345678
2.Open a web browser and enter: 192.168.254.254 or http://vonets.cfg


3.Log in to the bridge device console:
- Username: admin
- Password: admin
- Click "Login"
4.Configure bridging:
- Click "WIFI Search"
- Select your target WiFi network
- Click "Next"
5.Enter the target WiFi's password. Check and disable hotspot. Do not modify advanced/other settings.
6.Click "Submit"
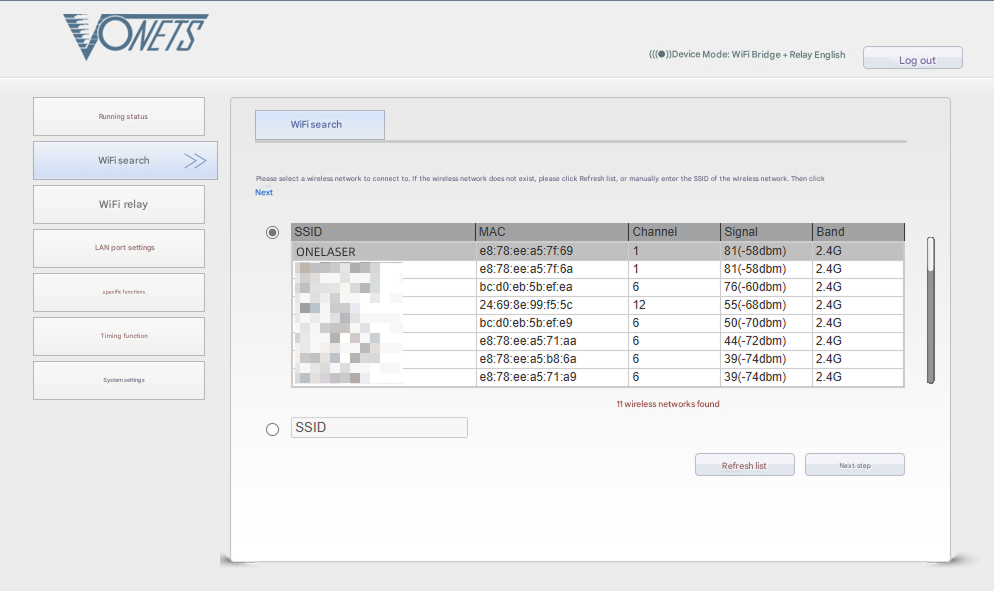
The device supports Wi-Fi 4 (802.11n) / Wi-Fi 5 (802.11ac) protocols. When bridging, the upstream router must not exceed Wi-Fi 5 standards (i.e., cannot use Wi-Fi 6/6E or Wi-Fi 7).
To verify the hotspot subnet on your computer:
①Windows: Open Command Prompt, type "ipconfig", and check the IPv4 address.
②Open WiFi settings, view network details, and locate "IP address".

To establish communication between the PC and machine via the above methods, follow these steps:
MakerBoost
Click "Switch" from right bottom corner of the software, then click "Create" to set up by the Devices setting.
Then follow instructions to complete the connection steps step by step. Critical: The entered IP MUST exactly match the Hydra Gen 2's configured address.
After successful device creation, select the newly created "Hydra Gen 2" entry in the machine list. Then click the "Connect" button. The software will instantly activate the connection.
For the detailed user manual of MakerBoost software, contact ONELASER Support to obtain the documentation.
Lightburn
Click "Devices" from right bottom corner of the software. Click "Create Manually" to set up by the Devices setting.
Then follow instructions to complete the connection steps step by step. Critical: Under Controller Type dropdown, MUST select "Ruida". The entered IP MUST exactly match the Hydra Gen 2's configured address.
After successful device creation, locate and select the newly created "Hydra Gen 2" entry in the bottom-right panel (Device List section).
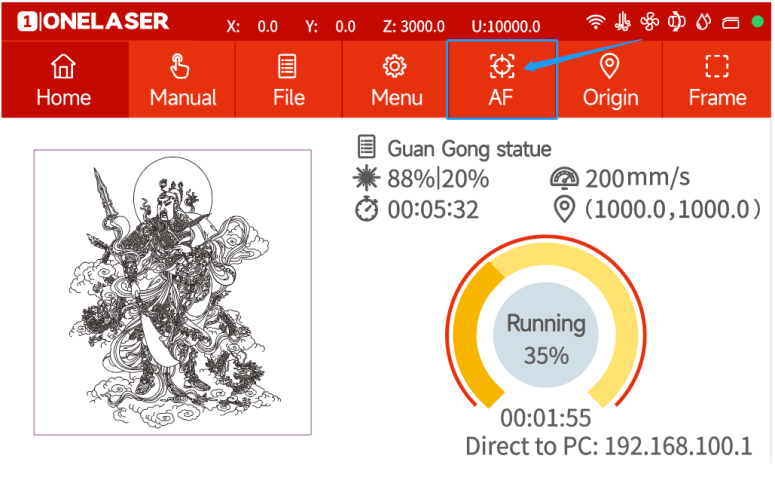
4.4 How to Use the Display
The Hydra Gen 2 features our self-developed GT5 control system – currently the most advanced on the market – combined with a touchscreen + physical keys dual-control panel, delivering smooth and intuitive operation.
|
Controller Model |
RDC6442G |
|
Memory |
1 GB |
|
USB Drive Compatibility |
Supports all storage capacities and models |
|
Software Capabilities |
Power-loss recovery / Parameter backup logic / Job time calculation / Online motherboard upgrades |
|
Display Features |
Real-time adjustment of power/speed / Thumbnail previews for graphics / Live progress tracking during processing |
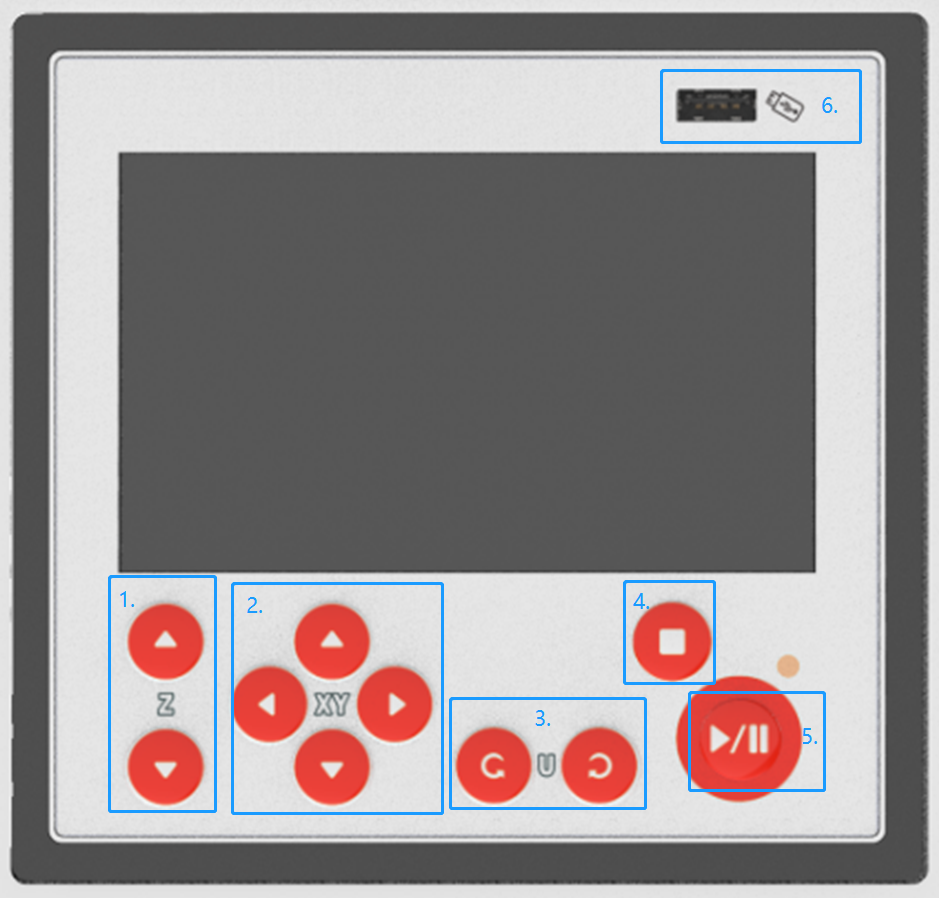
Physical buttons and connector
|
|
|
|
|
|
Home page

|
|
|
|
|
|
|
|
|
|
|
11. Water protection: Only for DC tubes. |
12. Door protection status: All doors are closed when it’s gray. It’s red when a door is opened. |
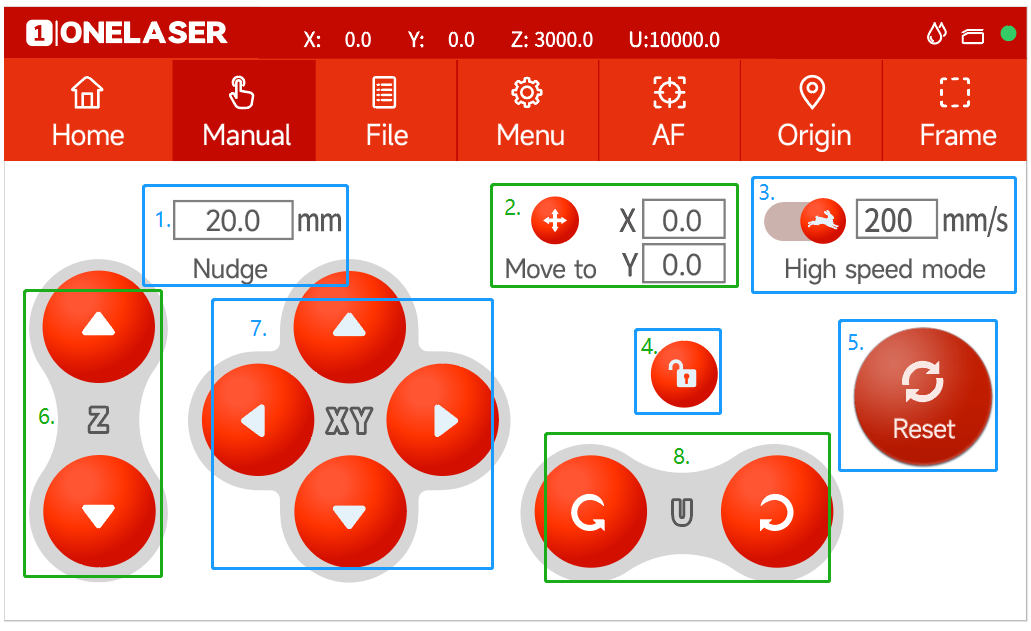
Manual page
This screen will show the manual buttons and the functions for adjusting the speed of the axes.
|
|
|
|
|
|
|
|
File page
This screen will display the file details, where you can select the corresponding file and modify the speed or power parameters of the file.
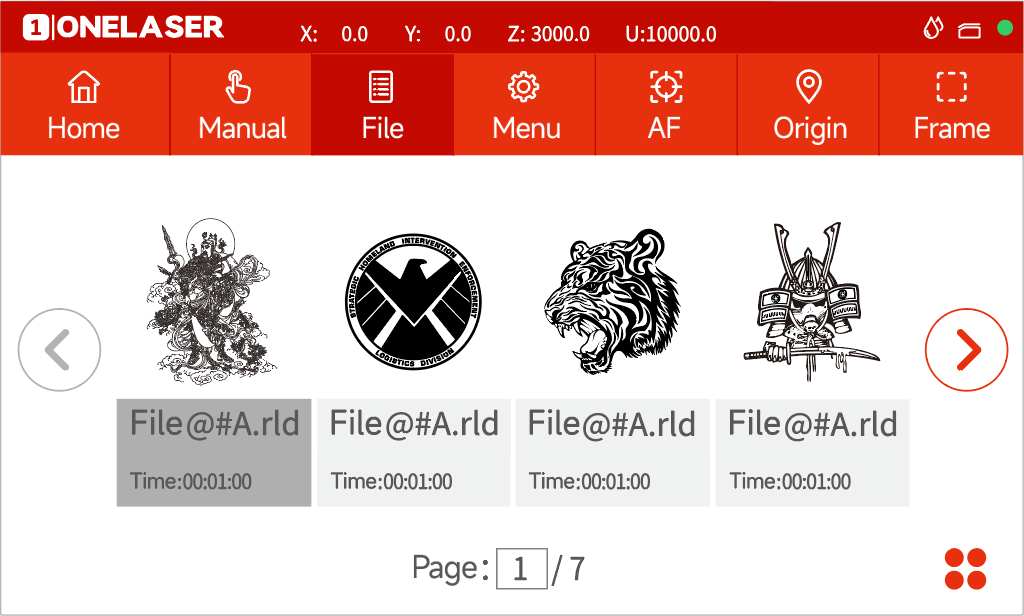

Settings: check more settings of file.
Select and hold a file for 2 seconds to select it to run.
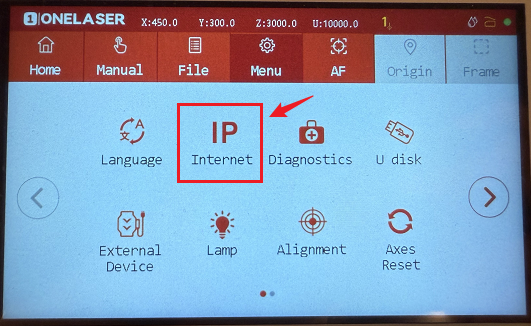
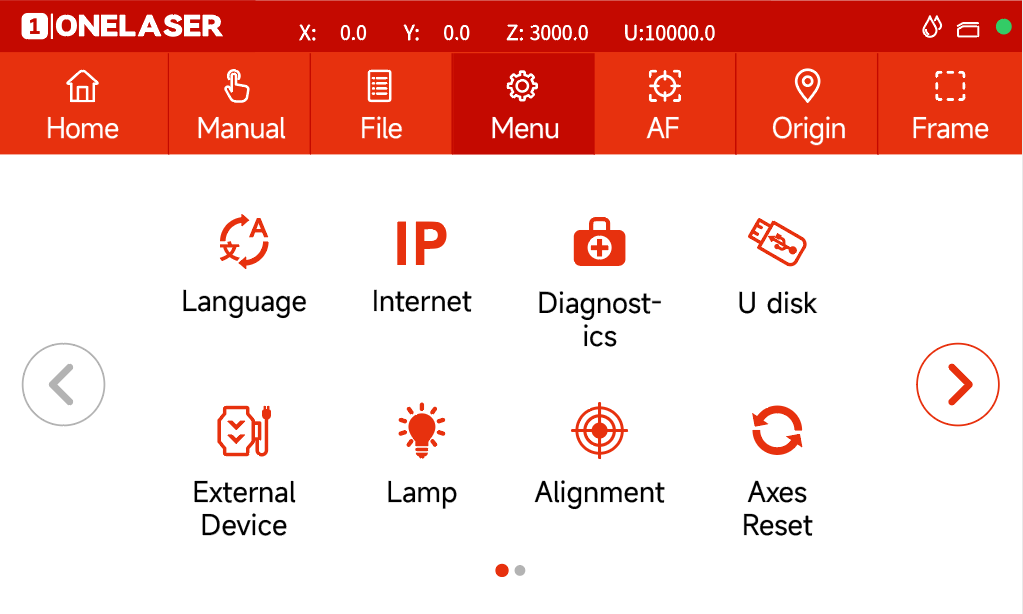
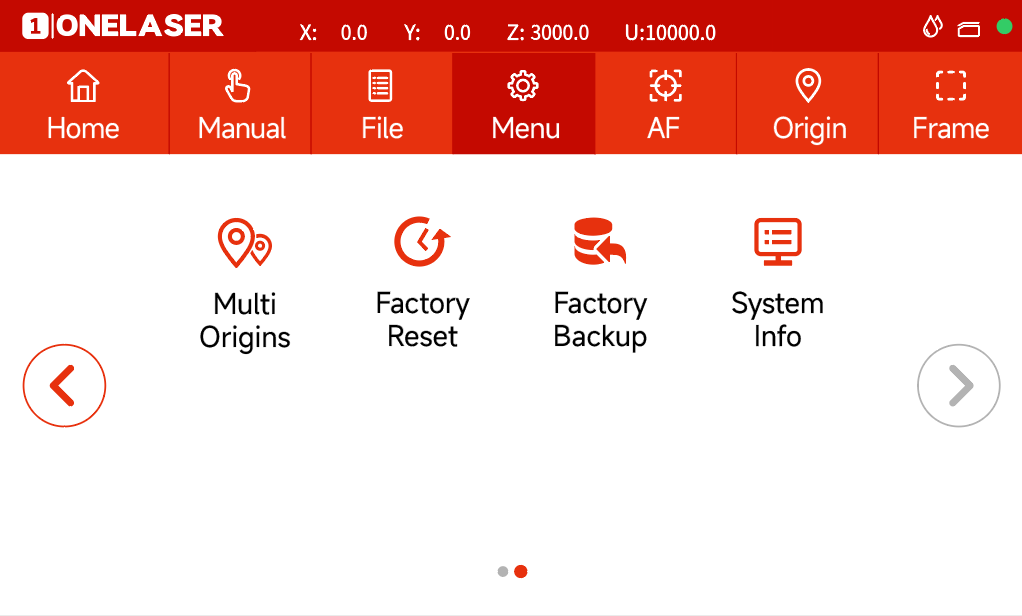
Menu page
This interface will show more features such as language, Internet and so on.
|
|
|
|
|
|
|
|
|
10. Factory Reset: Reset the vendor settings. |
|
11. Factory Backup: Set the current setting as vendor settings. |
12. System Info: Check all info of your laser. |
Others

Auto focus button: Click this button to auto focus after placing the materials on working area.

Origin button: Click this button after selecting a file.

Frame button: Click it to run a frame of your file after setting an origin.
4.5 How to Use the Manual or Auto-focus Function
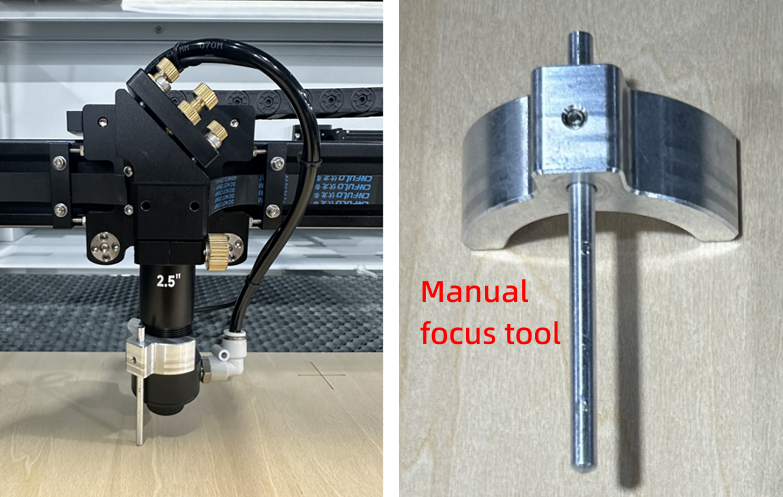
¶ 4.5.1 How to Use the Manual Focus Function
Place the manual focus tool between the material and the laser head. The focus distance is 6mm.
¶ 4.5.2 How to Use Auto-focus Function
Auto focus function can move up and down the laser head to make sure the most proper distance between the material and the focal lens. By using the auto focus function, users can focus quickly and accurately before cutting and engraving which saves the time of cutting and engraving and brings the better cutting engraving result.
Please follow the steps below to use the Auto focus function:
Move table down till there's enough space, then place the material on the table.
Move laser head over the material. Click AF button on panel. After that, the needed focus will be set automatically. Important: Ensure you press the auto-focus button only once per auto-focus operation.