¶ Vertigo First-Time Setup and Operation Guide
¶ 1. Getting Started
This guide will walk you through the essential steps required to safely set up the Vertigo laser system and complete your first engraving task. Whether you are a beginner or setting up a new machine, following these procedures will help ensure stable performance and reliable results from the very beginning.
¶ Important Safety Notice
Always supervise the machine during operation. Leaving the laser system unattended may result in safety hazards or damage to the equipment.
¶ 2. Initial Setup and Machine Preparation
Before performing any engraving, the machine must be properly initialized and prepared.
¶ Step 1: Level the Machine
Place the machine on a flat and stable work surface. Adjust the leveling feet at the bottom (near the casters) until the machine is level. You can verify this using the built-in level indicator inside the machine.
¶ Step 2: Connect Power and Start the Machine
Connect the machine to a power source using the power cable. Turn on the power switch and allow the machine to complete its startup process. During initialization, the laser head will automatically move to its default home position, typically located at the upper-left corner of the working area.

¶ 3. Computer Connection and Engraving Preparation
Before starting any engraving, you need to connect the machine to your computer and complete material positioning and focus adjustment.
¶ Step 1: Connect to Your Computer
Establish a connection between the machine and your computer using one of the following methods:
USB connection
Network (Ethernet) connection
Wireless (Wi-Fi) connection
Before proceeding, make sure your control software has successfully detected the machine.

¶ Step 2: Position the Material
After the machine has reset, place the material flat on the worktable. Ensure it is stable and properly aligned with the working area beneath the laser head.

¶ Step 3: Adjust the Focus
Adjust the height of the laser head and select the appropriate focusing method based on the material size.
If your machine supports autofocus and the material size is suitable, run the autofocus function to achieve optimal precision. Accurate focusing is essential for clean engraving results.

¶ 4. Verifying Optical Alignment
To maintain consistent engraving quality, it is important to ensure that the laser beam remains properly aligned throughout vertical movement.
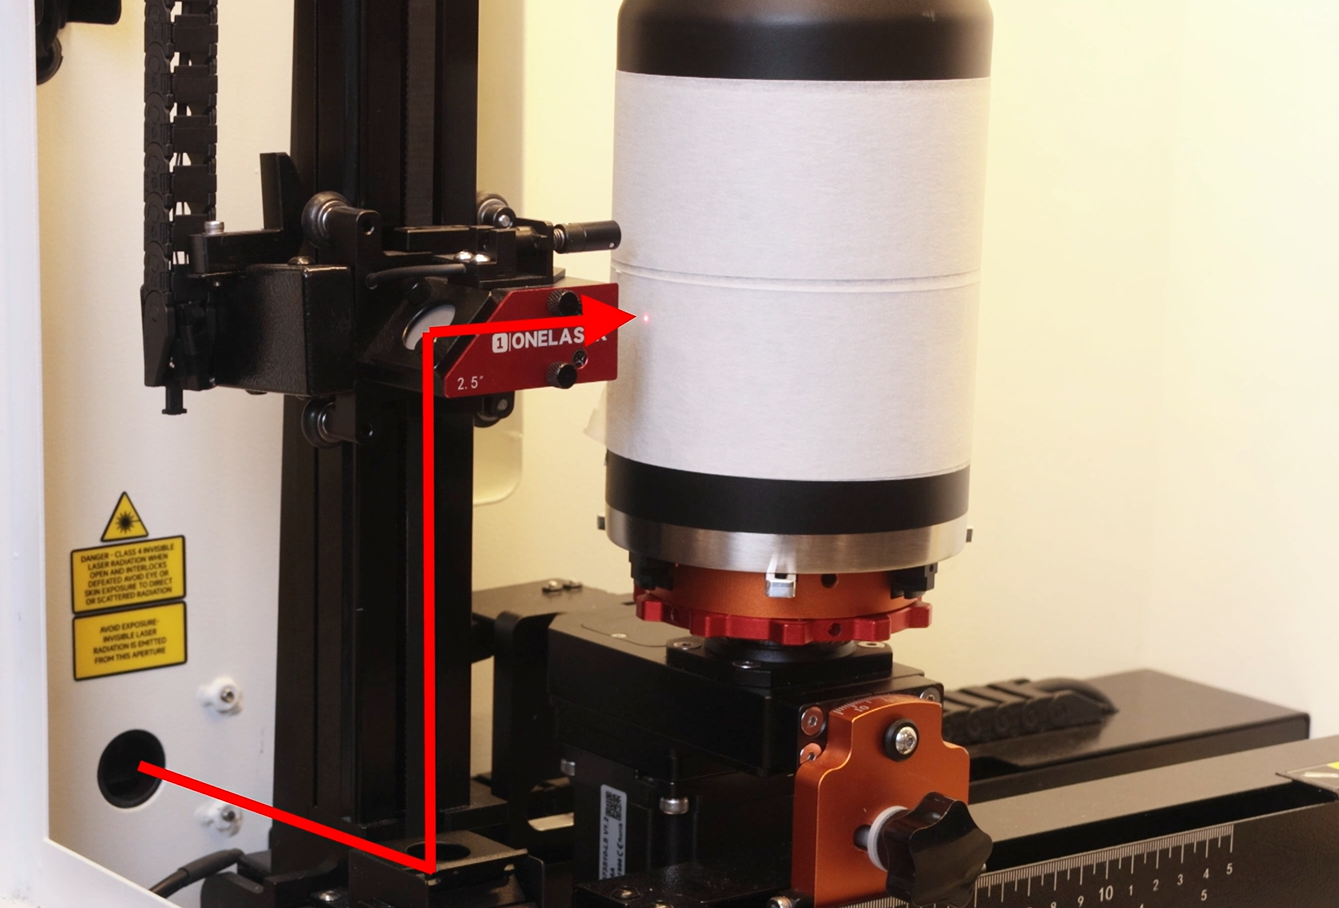
¶ How to Verify the Optical Path
Step 1: Prepare the Test Surface
Apply a small piece of double-sided tape over the entrance of the third mirror (where the laser beam enters the mirror assembly). Press the tape firmly along the edge so that a clear impression is formed, making it easier to determine whether the laser hits the center during testing.

Step 2: Test at the Lowest Position
Move the laser head to its lowest working position. Press the “Pulse” button to create a burn mark on the tape.
Then slightly raise the laser head and check whether the mark is located at the center of the mirror inlet.
If it is centered, no adjustment is needed.
If not, fine-tune the adjustment screws on the first mirror until the mark is centered.

Step 3: Test at the Highest Position
Without removing or moving the tape, raise the laser head to its highest working position. Press the “Pulse” button again to create a second mark.

¶ How to Evaluate the Results
Remove the tape and compare the two marks:
Center Alignment: The second mark should appear near the center of the third mirror inlet, just like the first mark.
Overlap Consistency: The two marks should overlap or be very close to each other.
If the second mark is clearly offset, it indicates that the beam alignment shifts with height changes. In this case, fine-tune the adjustment screws on the second mirror until the marks are centered, preventing accuracy loss or power reduction during operation.

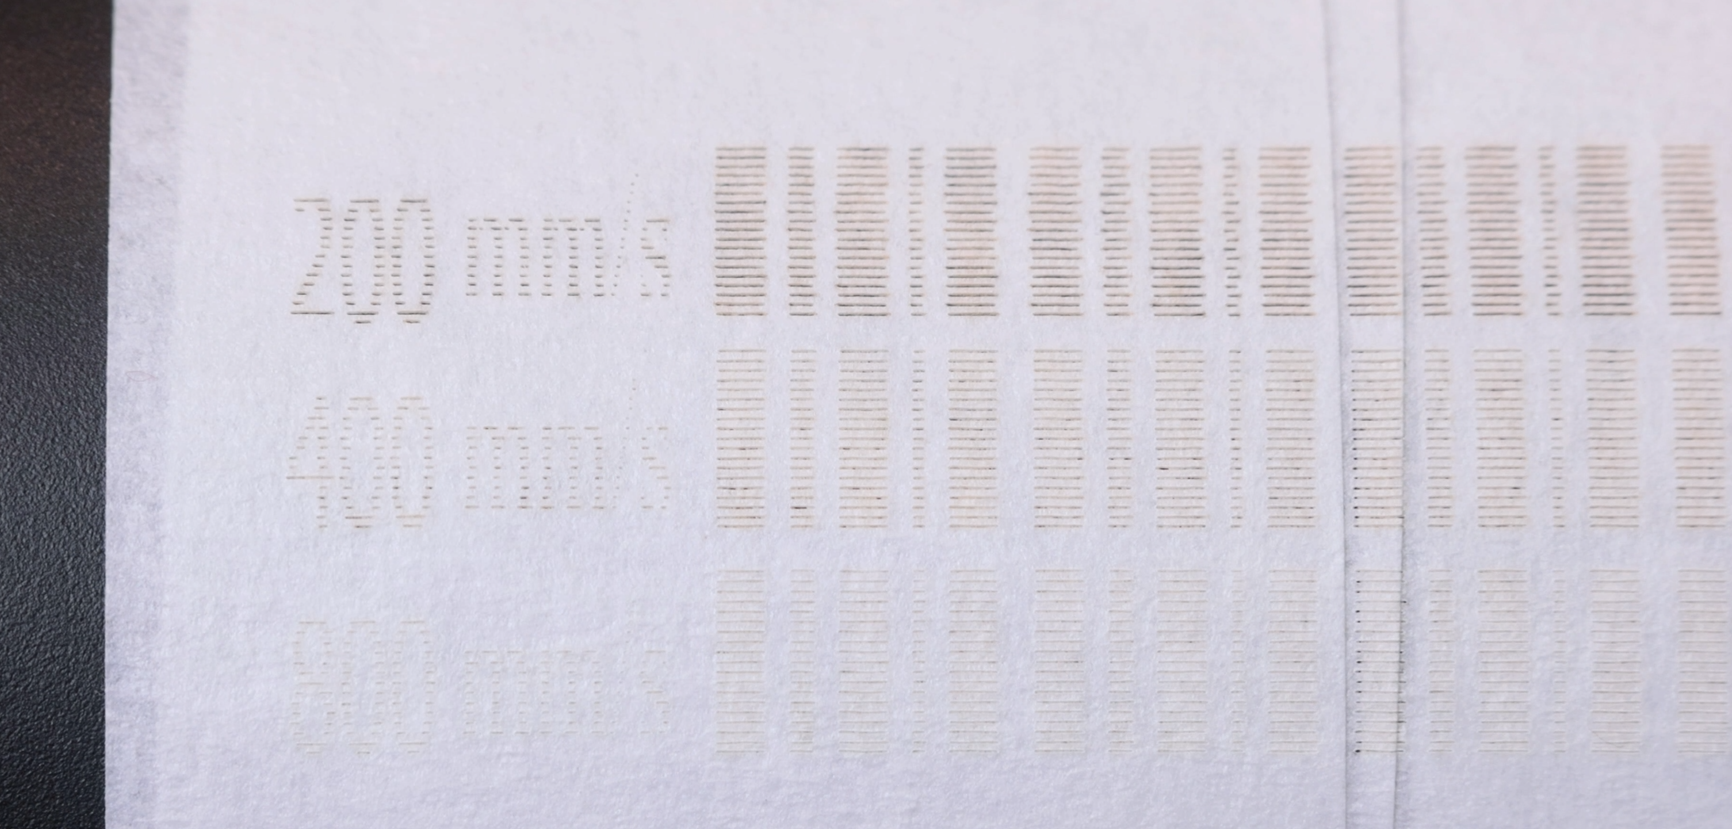
¶ 5. Checking Motion Accuracy (Backlash Test)
Mechanical backlash may occur when the motion system changes direction, especially during high-speed engraving. This test ensures accurate positioning and prevents visual defects such as uneven edges or misaligned lines.
¶ Option A: Using MakerBoost
Open the Settings menu from the top toolbar.
Select Scan Offset Adjustment.
Read the backlash values.
Run the full test and review the results.


If the result is correct (i.e., edges appear aligned to the naked eye), no adjustment is needed.
If edges are uneven, adjust the backlash values, apply them, and repeat the test until accurate results are achieved.
¶ Option B: Using LightBurn
Go to Device Settings.
Enable Scan Offset Adjustment.
Follow the guided calibration process provided by the software (the procedure is essentially the same as in MakerBoost).

If the backlash value cannot be read automatically, refer to the engraved value card included with the machine accessories. You can manually input the value and write it into the machine.
¶ 6. Running Your First Engraving
Once all setup and calibration steps are complete, you can begin your first engraving task.
Import a simple design file into the software and start the engraving process. Monitor the machine during operation to ensure smooth motion and consistent output quality.
¶ 7. Final Notes
A proper setup process is the foundation of high-quality laser engraving. By ensuring correct initialization, alignment, and motion calibration, you can significantly reduce errors and improve overall performance.
If you encounter any issues or require further assistance, please contact our technical support team for guidance.